igauge bandsaw companion instructions

Overview of the iGauge Bandsaw Companion

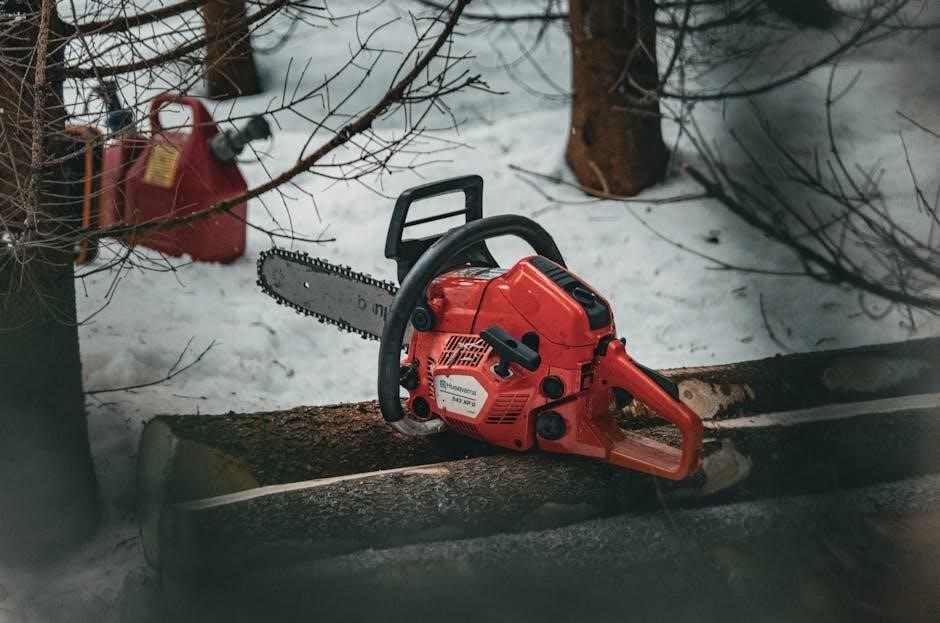
The iGauge Bandsaw Companion is a versatile 3-in-1 tool designed to streamline bandsaw setup and operation. It functions as a hook rule, compass, and alignment aid, ensuring precise cuts. Constructed from durable aluminum, it features rare-earth magnets for secure blade attachment and graduated markings for accurate measurements. This tool simplifies blade alignment, fence setup, and circle drawing, making it an essential accessory for woodworkers seeking professional-grade results.

Welcome to the iGauge Bandsaw Companion, a must-have tool for woodworkers seeking precision and efficiency. Designed to simplify bandsaw setup, this versatile accessory combines three essential functions: a hook rule, a compass, and a blade alignment aid. Built from durable aluminum, it features rare-earth magnets for secure attachment to the blade and graduated markings for accurate measurements. Whether you’re a professional or a DIY enthusiast, this tool ensures proper alignment of the blade, fence, and miter slot, eliminating drift and enabling straight, consistent cuts. Its compact design and intuitive functionality make it an indispensable addition to any woodworking workshop.

Key Features and Specifications

The iGauge Bandsaw Companion is a 12-inch-long aluminum tool designed for precision and durability. It features rare-earth magnets for secure attachment to bandsaw blades, ensuring stability during use. The ruler includes 1/16, 1/32, and 1mm graduations for precise measurements. Drilled holes on the backside enable its use as a compass for drawing circles up to 23 inches in diameter. This 3-in-1 tool functions as a hook rule, compass, and blade alignment aid, making it an essential accessory for woodworkers. Its compact design and robust construction ensure long-lasting performance in various woodworking applications.

Primary Functions of the Tool

The iGauge Bandsaw Companion serves three primary functions: blade alignment, compass, and hook rule. It helps align the blade with the fence and miter slot, ensuring accurate cuts. The tool’s drilled holes allow it to draw precise circles for tasks like creating bowl blanks. Additionally, it functions as a hook rule, measuring blade height and setup. These functions collectively enhance bandsaw performance, making it an indispensable tool for woodworkers aiming for professional-grade results. Its multifunctional design streamlines setup processes, saving time and improving overall woodworking efficiency.

Key Features and Specifications

The iGauge Bandsaw Companion is a 3-in-1 tool with a 12-inch length and 1.5-inch width. It features rare-earth magnets for secure blade attachment, 1/16, 1/32, and 1mm markings, and drilled holes for compass use. Designed for precision, it aids in blade alignment, fence setup, and drawing consistent circles, making it a versatile accessory for professional and DIY woodworking projects.

Design and Build Quality

The iGauge Bandsaw Companion is crafted from durable aluminum, ensuring a lightweight yet robust design. Its 12-inch length and 1.5-inch width provide easy handling and portability. The tool features rare-earth magnets for secure attachment to bandsaw blades, enhancing stability during setup. The ruler’s graduated markings in 1/16, 1/32, and 1mm increments offer precision for various woodworking tasks. Its compact form and corrosion-resistant finish ensure long-term reliability. Designed with practicality in mind, the Companion withstands regular workshop use, making it a reliable accessory for precise bandsaw alignments and measurements.

Measurement Markings and Graduations

The iGauge Bandsaw Companion features precise measurement markings, including 1/16, 1/32, and 1mm graduations on the front side. These markings are ideal for accurate height gauging and fine adjustments. On the back, drilled holes in 1/2-inch increments allow for consistent circle drawing, making it perfect for creating bowl blanks or other rounded projects. The dual-scale design ensures versatility for both imperial and metric measurements, catering to a wide range of woodworking needs. The clear, engraved markings enhance readability, enabling quick and precise setups, while the compact design ensures the tool remains portable and easy to use in various workshop scenarios.

Rare-Earth Magnets for Secure Attachment

The iGauge Bandsaw Companion utilizes two rare-earth magnets for a strong, secure attachment to the bandsaw blade. These magnets ensure the tool remains firmly in place during setup and alignment, preventing any shifting that could compromise accuracy. The magnets are strategically positioned next to an indent designed to accommodate the blade set, allowing for precise alignment without causing damage to the blade. This secure attachment is particularly effective on blades 12 inches or wider, ensuring stability and reliability during the alignment process. The robust magnetic connection is a key feature that enhances the tool’s functionality and ease of use.

Setting Up Your Bandsaw with the Companion

Setting up your bandsaw with the iGauge Companion is straightforward. Attach the tool to the blade, align the blade, fence, and miter slot, and ensure accurate cuts. Ideal for blades 12 inches or wider.

Preparation for Initial Setup

Before using the iGauge Bandsaw Companion, ensure your bandsaw is properly tuned with adequate blade tension and aligned wheels. Gather necessary tools like Allen wrenches, a square, and setup blocks. Clean and dry the blade for secure magnet attachment. Loosen the table bolts, keeping one snug as a pivot. Attach the Companion to the blade, aligning it with the blade’s edge. Use the measurement markings and drilled holes for precise adjustments. Ensure the Companion is securely attached and aligned before making any adjustments. Double-check all alignments after tightening bolts for accuracy and safety.

Attaching the Companion to the Bandsaw Blade

To attach the iGauge Bandsaw Companion, start by ensuring the blade is clean and dry for optimal magnet adhesion. Align the Companion’s magnetic side with the blade’s edge, snapping it securely into place. The rare-earth magnets will hold the tool firmly. Ensure the Companion is centered and evenly aligned with the blade’s width. For blades 12 inches or wider, attachment is most effective. Once attached, verify the tool’s position by gently tugging on it to ensure a secure fit. Proper attachment is crucial for accurate alignment and functionality.

Aligning the Blade, Fence, and Miter Slot

With the Companion attached to the blade, loosen the bandsaw table bolts slightly, keeping one snug as a pivot point. Use the tool to visually align the blade with the miter slot and fence. Ensure the blade’s edge is parallel to both the miter slot and fence. Adjust the table position as needed until alignment is achieved. Tighten the table bolts firmly once proper alignment is confirmed. This step ensures accurate cuts by eliminating blade drift. Use a square to double-check the alignment for precision. Proper alignment is critical for consistent and straight cuts in your woodworking projects.

Blade Alignment Process

The iGauge Bandsaw Companion simplifies blade alignment by attaching to the blade via rare-earth magnets. Loosen the table bolts, align the blade with the miter slot and fence, ensuring parallelism. Use a square to verify accuracy. Proper alignment ensures straight, drift-free cuts, enhancing woodworking precision and safety.

Understanding the Importance of Proper Alignment

Proper blade alignment is crucial for accurate cuts and extended blade life. Misalignment can cause uneven cuts, increased wear, and potential safety hazards. The iGauge Bandsaw Companion ensures precise alignment of the blade, fence, and miter slot. By securing to the blade with rare-earth magnets, it simplifies adjustments, ensuring parallelism and reducing drift. This results in straighter cuts, less waste, and safer operation, making it an indispensable tool for both professionals and DIY woodworkers aiming for precise and consistent results.

Step-by-Step Guide to Aligning the Blade

Attach the iGauge Bandsaw Companion to the blade using its rare-earth magnets. Loosen the table bolts, keeping one snug as a pivot. Align the blade with the miter slot and fence, ensuring parallelism. Use the tool’s markings to verify alignment. Once aligned, tighten the bolts securely. This process ensures accurate cuts and reduces drift. The tool’s extended length provides clear visibility, making adjustments precise and efficient. Proper alignment enhances blade performance and prolongs its lifespan, ensuring consistent results for woodworking projects;

Using the Companion as a Hook Rule

The iGauge Bandsaw Companion serves as an effective hook rule, enabling precise measurement of blade-to-fence and blade-to-miter-slot distances. Attach the tool to the blade using its rare-earth magnets, ensuring a secure fit. The graduated markings on the ruler allow for accurate readings, essential for proper setup. By aligning the hook with the fence or miter slot, users can verify parallelism and make adjustments as needed. This feature helps eliminate cutting errors and ensures consistent results. The tool’s compact design and clear markings make it an indispensable aid for achieving accurate bandsaw alignment.

Using the Companion as a Compass

The Companion’s drilled holes enable drawing circles up to 23 inches in diameter for bowl blanks. It ensures consistent diameters and precise measurements, simplifying woodworking projects.

Drilled Holes for Drawing Circles

The iGauge Bandsaw Companion features drilled holes along its length, spaced at 1/2-inch increments, allowing users to draw precise circles for woodworking projects. These holes enable consistent and accurate circle drawing, particularly useful for creating bowl blanks or other rounded designs. The tool’s design ensures that users can achieve uniform diameters, simplifying the process of marking and cutting curved shapes. This feature is especially beneficial for woodturners and craftspeople who need to create symmetrical, professional-grade pieces. The Companion’s compass function enhances workflow and precision in woodworking tasks.

  • Drilled holes at 1/2-inch intervals for consistent circle drawing.
  • Capable of drawing circles up to 23 inches in diameter.
  • Ideal for bowl blanks and other rounded woodworking projects.

Creating Consistent Diameters for Bowl Blanks

The iGauge Bandsaw Companion excels at creating consistent diameters for bowl blanks, ensuring uniformity in woodworking projects. Its drilled holes, spaced at 1/2-inch intervals, allow for precise circle drawing up to 23 inches in diameter. This feature is particularly useful for woodturners, enabling them to mark accurate, symmetrical blanks efficiently. The tool’s compass function streamlines the process, reducing errors and saving time. By providing consistent measurements, the Companion helps woodworkers achieve professional-grade results with ease and precision.

  • Drilled holes at 1/2-inch intervals for accurate circle drawing.
  • Capable of creating diameters up to 23 inches for bowl blanks.
  • Ensures uniformity and symmetry in woodworking projects.

Best Practices for Using the Compass Function

For optimal results with the iGauge Bandsaw Companion’s compass function, ensure the tool is securely attached to the blade using the rare-earth magnets. Clean the magnets before use to maintain a strong hold. Use the drilled holes on the back side to draw consistent circles, starting with smaller diameters to ensure accuracy. Mark the desired radius with a pencil or marker for visibility. Avoid applying too much pressure, which could bend the tool. Regularly inspect the holes for debris to ensure smooth operation. This method ensures precise, symmetrical circles for bowl blanks or other projects.

  • Clean magnets before use for secure attachment.
  • Use drilled holes for consistent circle drawing.
  • Start with smaller diameters to ensure accuracy.

Troubleshooting Common Issues

Address blade misalignment by recalibrating with the Companion. Ensure secure attachment of magnets to the blade. For circle drawing issues, verify hole alignment and measurement accuracy.

Blade Not Aligning Properly

If the blade isn’t aligning correctly, ensure the Companion is securely attached using the rare-earth magnets. Loosen the table bolts, keeping one snug as a pivot point. Use the tool’s extended length to visually align the blade with the fence and miter slot. Double-check that the indent next to the magnets accommodates the blade set properly. If issues persist, refer to the downloadable instruction sheet for detailed calibration steps to achieve accurate alignment and eliminate drift during cuts.

Companion Not Attaching Securely to the Blade

If the Companion isn’t attaching securely, ensure the blade is clean and free of debris, as dirt can interfere with the rare-earth magnets. Verify the blade width is at least 12 inches for optimal attachment. Snap the tool firmly onto the blade, aligning the indent next to the magnets with the blade set. If issues persist, check for blade thickness compatibility or adjust the attachment angle. Refer to the instruction sheet for troubleshooting steps to ensure a secure fit and proper functionality during use.

Difficulty in Drawing Accurate Circles

If you’re experiencing difficulty drawing accurate circles, ensure the drilled holes on the back side are properly aligned with the center of your material. Verify that the pivot point is securely placed and centered. Use a sharp marker or pencil for clear markings. If circles are uneven, check that the Companion is firmly attached to the blade and the tool is held steady during use. Clean the drilled holes periodically to ensure smooth operation. For larger diameters, consider using a separate pivot point or adjusting the tool’s alignment for consistent results.

Maintenance and Care

  • Clean the tool regularly with a soft cloth to maintain accuracy and prevent rust.
  • Store in a dry place to avoid moisture damage.
  • Inspect magnets and measurement markings for wear and replace if necessary.

Cleaning the Companion

Regular cleaning is essential to maintain the accuracy and longevity of the iGauge Bandsaw Companion. Use a soft, dry cloth to wipe down the tool, removing any dust, wood shavings, or debris. Avoid using harsh chemicals or abrasive materials, as they may damage the aluminum surface or magnets. For more thorough cleaning, lightly dampen the cloth with water, but ensure the tool is completely dry afterward to prevent rust or corrosion. Never submerge the Companion in water or expose it to excessive moisture. After cleaning, inspect the measurement markings and magnets for any residue or damage and store the tool in a dry, protected area.

Storing the Tool Properly

To maintain the iGauge Bandsaw Companion’s performance, store it in a dry, cool environment away from direct sunlight. Avoid exposing it to moisture, as this could corrode the metal or weaken the magnets. Use a protective case or pouch to prevent scratches and damage. Do not store the tool attached to the bandsaw blade, as this may cause misalignment or stress on the magnets. Keep it away from extreme temperatures and heavy objects that could bend or warp the aluminum body. Proper storage ensures the tool remains accurate and ready for future use.

Inspecting for Wear and Tear

Regularly inspect the iGauge Bandsaw Companion for signs of wear and tear to ensure optimal performance. Check the rare-earth magnets for strength and alignment accuracy. Inspect the ruler markings for clarity and verify the drilled holes for compass functionality. Look for scratches or bends on the aluminum body that could affect precision. If the tool shows significant wear, such as weakened magnets or warped edges, consider replacing it. Neglecting inspections may lead to inaccurate measurements and alignment issues. Routine checks ensure the tool remains reliable and maintains its ability to deliver precise results for your woodworking projects.

Safety Precautions

Always wear safety glasses and keep loose clothing tied back when using the bandsaw. Ensure the Companion is securely attached to avoid accidents. Keep the work area clean and well-lit, and follow all bandsaw safety guidelines. Never touch moving blades or components while the machine is in operation. Maintain a firm grip on the tool and avoid overreaching. Regularly inspect the Companion for damage before use. Adhere to manufacturer instructions for safe and proper usage.

General Safety Guidelines for Bandsaw Use

Always wear protective gear, including safety glasses and a dust mask. Keep loose clothing and long hair tied back to avoid entanglement. Ensure the bandsaw is properly set up and maintained, with all guards in place. Never operate the saw with damaged or dull blades, as they can cause kickback. Maintain a firm, steady grip on materials and avoid overreaching. Keep children and pets away from the work area. Stay alert and focused, avoiding distractions while operating the bandsaw. Regularly inspect the machine for wear and tear, and follow the manufacturer’s instructions for safe operation. Keep a fire extinguisher nearby and ensure proper ventilation.

Specific Safety Tips for the Companion Tool

Handle the iGauge Bandsaw Companion with care to avoid scratching or damaging its precision markings. Ensure the rare-earth magnets are clean and free of debris for secure attachment to the blade. When using the tool as a compass, keep hands clear of the rotating blade to prevent injury. Store the Companion in a dry place, away from direct sunlight, to maintain its accuracy. Regularly inspect the tool for wear or damage and replace it if necessary. Always follow the manufacturer’s instructions for proper use and attachment to ensure safe and effective operation of the bandsaw setup.

Emergency Procedures

In case of an emergency while using the iGauge Bandsaw Companion, immediately turn off the bandsaw and disconnect the power supply. If the tool becomes stuck or misaligned, do not force it loose, as this may damage the blade or the Companion. Inspect for any damage or debris before resuming use. If the blade breaks or malfunctions, follow standard bandsaw safety protocols to prevent injury. Keep emergency contact information handy and consult a professional if the issue persists. Always prioritize safety and proper tool maintenance to avoid accidents during operation.

Comparison with Other Bandsaw Setup Tools

The iGauge Bandsaw Companion stands out for its 3-in-1 functionality, combining alignment, compass, and hook rule features. Its rare-earth magnets and precise graduations offer superior accuracy and convenience compared to traditional setup methods, making it a more versatile and efficient choice for woodworkers.

Advantages Over Traditional Setup Methods

The iGauge Bandsaw Companion offers significant advantages over traditional setup methods by eliminating the need for multiple tools. Its 3-in-1 design combines a hook rule, compass, and alignment aid, streamlining the setup process. The tool’s rare-earth magnets provide a secure attachment to the blade, ensuring stability during alignment. Unlike traditional methods, it allows for precise blade, fence, and miter slot alignment in one step, reducing errors and saving time. Additionally, the built-in compass feature enables accurate circle cutting without requiring a separate tool, making it a more efficient and versatile solution for woodworkers.

Comparison with Similar Tools on the Market

The iGauge Bandsaw Companion stands out among similar tools due to its 3-in-1 functionality, combining a hook rule, compass, and alignment aid. Unlike many competitors, it features rare-earth magnets for secure blade attachment and precise measurement markings, including 1/16, 1/32, and 1mm increments. Its durable aluminum build and ability to draw circles up to 23 inches in diameter make it more versatile than many single-purpose tools. Additionally, its compact design and competitive pricing give it an edge over bulkier or more expensive alternatives, making it a preferred choice for woodworkers seeking efficiency and accuracy.

Unique Benefits of the iGauge Companion

The iGauge Companion offers unmatched versatility as a 3-in-1 tool, serving as a hook rule, compass, and blade alignment aid. Its rare-earth magnets ensure a secure, hands-free attachment to the blade, while the dual measurement markings (1/16, 1/32, and 1mm) cater to both imperial and metric users. The tool’s ability to draw precise circles up to 23 inches in diameter is unparalleled, making it ideal for bowl blank preparation. Its compact, lightweight design and durable construction provide long-term reliability, setting it apart from competitors and making it an indispensable asset for woodworkers seeking precision and efficiency.

Customer Reviews and Feedback

Customers praise the iGauge Companion for its ease of use and effectiveness in aligning blades and drawing circles. Many highlight its durability and value for precise woodworking results.

Positive Aspects Highlighted by Users

Users praise the iGauge Companion for its effectiveness in bandsaw setup, particularly its ability to align the blade, fence, and miter slot, preventing cutting drift. The tool’s sturdy build and ease of use are frequently highlighted, making it a favorite among both professionals and DIY woodworkers. Its multiple functions—hook rule, compass, and alignment aid—streamline workflow and enhance precision. The clear markings and secure attachment via rare-earth magnets are also appreciated, contributing to accurate and consistent results in various woodworking projects.

Common Complaints or Areas for Improvement

Some users have noted that the iGauge Bandsaw Companion’s magnets may not hold as securely on thinner or narrower blades, potentially affecting alignment accuracy in certain setups. A few woodworkers have mentioned that the tool’s instructions could be more detailed, especially for novice users unfamiliar with bandsaw calibration. Additionally, there have been occasional comments about the durability of the markings over time with heavy use. While these issues are minor, addressing them could further enhance the tool’s performance and user satisfaction across a broader range of applications and skill levels.

Testimonials from Professional Woodworkers

Professional woodworkers have praised the iGauge Bandsaw Companion for its effectiveness in ensuring precise blade alignment and improving overall bandsaw performance. Many have highlighted its ease of use and versatility, particularly in eliminating drift and ensuring the blade, miter slot, and fence remain parallel. One professional noted it as an “excellent tool for setup,” while another appreciated its ability to streamline the calibration process. The tool’s durability and accuracy have made it a favorite among both seasoned craftsmen and DIY enthusiasts, with many considering it an indispensable addition to their workshop arsenal.

The iGauge Bandsaw Companion is a must-have tool for woodworkers, offering precision, versatility, and ease of use. It simplifies blade alignment, circle drawing, and setup, ensuring accurate results.

Final Thoughts on the iGauge Bandsaw Companion

The iGauge Bandsaw Companion is a game-changer for woodworkers, combining functionality and durability. Its ability to serve as a hook rule, compass, and alignment tool makes it indispensable. With rare-earth magnets ensuring secure attachment and precise measurements, it enhances bandsaw performance. The tool’s design and build quality are exceptional, offering long-term reliability. Whether for professionals or DIY enthusiasts, it delivers consistent results, making it a worthwhile investment for anyone seeking to elevate their woodworking projects.

Recommendation for Woodworking Enthusiasts

The iGauge Bandsaw Companion is a must-have tool for woodworking enthusiasts seeking precision and efficiency. Its 3-in-1 functionality simplifies blade alignment, circle drawing, and measurements, making it ideal for both professionals and hobbyists. The durable design and ease of use ensure long-term reliability. Whether you’re fine-tuning your bandsaw or creating intricate projects, this tool enhances accuracy and streamlines your workflow. Highly recommended for anyone looking to elevate their woodworking skills and achieve professional-grade results with minimal effort.

Future Updates and Potential Enhancements

Future updates for the iGauge Bandsaw Companion could focus on enhancing its versatility and usability. Potential improvements might include adding more measurement markings or adjustable magnets for wider blade compatibility. Incorporating digital features, such as a built-in level or Bluetooth connectivity for mobile app integration, could further streamline the setup process. Additionally, expanding the tool’s length or offering interchangeable attachments could cater to diverse woodworking needs. Continuous feedback from users will guide these enhancements, ensuring the tool remains a leading choice for bandsaw optimization and precision woodworking. Regular software or design updates will keep it aligned with evolving woodworking practices.

Additional Resources

Access downloadable instruction sheets, video tutorials, and customer support information to maximize your iGauge Bandsaw Companion experience. These resources provide detailed guidance and troubleshooting tips.

Downloadable Instruction Sheet

A comprehensive downloadable instruction sheet is available for the iGauge Bandsaw Companion, detailing setup, usage, and maintenance. It covers blade alignment, compass functions, and troubleshooting tips. The guide includes step-by-step instructions for attaching the tool to the blade, aligning components, and drawing circles. With over 765 downloads, it’s a trusted resource for optimal tool performance. Access it online to ensure proper use and maximize the tool’s benefits. This sheet is essential for both novice and experienced woodworkers seeking precise bandsaw operations.

Video Tutorials and Guides

Video tutorials and guides for the iGauge Bandsaw Companion are available online, providing visual instruction for setup and use. Produced by experts like Tod Raines of the Woodturning Tool Store, these videos demonstrate the tool’s three functions: blade alignment, hook rule usage, and compass operation. They cover step-by-step processes, troubleshooting, and best practices, ensuring users master the tool’s capabilities. These resources are invaluable for both novices and experienced woodworkers, offering clear, actionable guidance to optimize bandsaw performance and achieve professional results. Videos are accessible on platforms like YouTube, enhancing the learning experience.

Customer Support and Warranty Information

The iGauge Bandsaw Companion is backed by reliable customer support, ensuring users receive assistance with setup, troubleshooting, and maintenance. The manufacturer provides downloadable resources, including instruction sheets, to guide users effectively. Warranty details are available on the official website, offering coverage for defects in materials and workmanship. For inquiries, customers can contact the support team via email or through the website’s contact form. Additionally, the support team is available to address technical questions and provide tips for optimal tool performance. For the most accurate and up-to-date warranty information, visit the official iGauge website.

rottnest island accommodation map pdf

Rottnest Island offers a serene retreat with stunning beaches and unique wildlife. An accommodation map is essential for navigating the island’s cozy stays, ensuring easy access to key locations and planning an unforgettable visit.

1.1 Overview of Rottnest Island

Rottnest Island is a stunning offshore destination in Western Australia, known for its pristine beaches, turquoise waters, and vibrant history. As a Class A nature reserve, it spans 11 kilometers in length and 4.5 kilometers at its widest point. The island is celebrated for its diverse wildlife, including the iconic quokkas, and its rich cultural heritage. With its serene atmosphere and natural beauty, Rottnest Island attracts visitors seeking relaxation, adventure, and a deeper connection with nature. Its compact size makes it easily explorable by bike or bus, offering a unique getaway from the mainland’s hustle and bustle.

1.2 Importance of Accommodation Maps

Accommodation maps are crucial for planning a seamless stay on Rottnest Island. They provide detailed insights into the locations of various lodging options, key amenities, and nearby attractions. With so many choices—from cozy cottages to campsites—the map helps visitors match their preferences with the ideal spot. It also highlights essential services like bike hires, dining options, and bus stops, ensuring guests can maximize their time. Referencing the map aids in navigation, making the exploration of Rottnest’s hidden bays and trails effortless. It’s an indispensable tool for both newcomers and returning visitors, enhancing the overall island experience.

Types of Accommodation on Rottnest Island

Rottnest Island offers diverse accommodations, including luxurious hotels, self-contained units, and eco-friendly camping options, catering to all preferences and budgets for a memorable island getaway.

2.1 Hotels and Resorts

Rottnest Island’s hotels and resorts provide luxurious stays with stunning ocean views and modern amenities. Places like Karma Rottnest offer serene retreats, blending comfort with the island’s natural beauty. These establishments are strategically located near beaches and key attractions, making them ideal for both relaxation and exploration. Many resorts feature upscale dining options, spas, and activities, ensuring a memorable experience. Whether you’re seeking tranquility or adventure, these accommodations cater to diverse needs, offering a perfect blend of comfort and island charm. They are a top choice for travelers looking to unwind in style.

2.2 Self-Contained Units

Self-contained units on Rottnest Island offer a perfect blend of privacy and convenience. These units are ideal for families or groups, providing fully equipped kitchens and comfortable living areas. Located in scenic areas, they allow guests to immerse themselves in the island’s tranquility. Units vary in size, from cozy one-bedroom options to spacious four-bedroom accommodations, ensuring suitability for all needs. Many are situated near beaches and amenities, as indicated on the accommodation map. They provide a home-away-from-home experience, making them a popular choice for those seeking flexibility and independence during their stay on the island.

2.3 Camping and Glamping Options

Camping and glamping on Rottnest Island offer unique ways to connect with nature. The Stay Rottnest Campground provides basic campsites for a rustic experience, while glamping options offer luxury tents with modern amenities. These options are perfect for nature lovers seeking an immersive experience. The accommodation map highlights the campground’s location near beaches and facilities. Both camping and glamping allow visitors to enjoy the island’s serene environment while staying close to key attractions. It’s an excellent choice for those wanting to experience Rottnest’s natural beauty without compromising on comfort.

Booking Tips for Rottnest Island Accommodation

Plan ahead and book early to secure your preferred Rottnest Island accommodation. Check peak seasons, use reliable platforms, and review refurbishment schedules to ensure a smooth stay.

3.1 High Demand Periods

Rottnest Island experiences high demand during peak holiday seasons, particularly around Christmas and school holidays. The island’s accommodation booking system often faces heavy traffic, leading to website crashes. Visitors are advised to plan early and secure bookings well in advance to avoid missing out. The Christmas period is especially popular, with many travelers seeking to enjoy the island’s serene beaches and unique wildlife during this time. Proactive booking strategies are essential to ensure a smooth and enjoyable stay on Rottnest Island.

3.2 Online Booking Platforms

Rottnest Island’s accommodation can be effortlessly booked through online platforms like the revamped Stay Rottnest website, offering a seamless experience for travelers. These platforms provide real-time availability, secure payments, and detailed property descriptions. Users can filter options by budget, location, and amenities, ensuring a perfect match for their needs. The website also features interactive maps, helping visitors plan their stay and explore the island. With mobile-friendly designs and customer support, online booking platforms enhance convenience for planning a memorable trip to Rottnest Island, making it easier to secure ideal accommodations and create an unforgettable itinerary.

3.3 Refurbishment and Upgrades

Rottnest Island’s accommodation sector is undergoing significant refurbishments to enhance guest experiences. Geordie Bay units are being upgraded, including interiors, balconies, and courtyards, to offer modern comforts while preserving the island’s charm. Additionally, the Quokka Arms Hotel has completed a $500,000 renovation, and asbestos removal projects are underway to ensure safety and sustainability. These upgrades reflect a commitment to improving facilities without compromising the island’s natural beauty, ensuring visitors enjoy updated amenities while connecting with Rottnest’s unique environment.

Rottnest Island Map Details

The map highlights key locations like Geordie Bay, Oliver Hill, and Cathedral Rocks, guiding visitors to accommodation, bike rides, and ferry services, ensuring easy navigation and exploration.

4.1 Key Locations on the Map

Rottnest Island’s map highlights essential spots for visitors. Key locations include Geordie Bay, Parakeet Bay, and The Basin, known for their pristine beaches. Oliver Hill and Cathedral Rocks are notable landmarks, while Stark Bay and Mary Cove offer serene environments. The map also marks the Island Explorer Bus Stops, ensuring easy transportation. Bike hire shops and snorkel rental services are prominently featured, catering to adventure seekers. Additionally, ferry arrival and departure points are clearly indicated, simplifying travel planning. These key locations provide a comprehensive guide, helping visitors navigate and enjoy the island’s diverse offerings seamlessly.

4.2 Suggested Bike Rides and Routes

Rottnest Island offers scenic bike rides for all skill levels. Ride 1 is a 4km, 30-minute loop around Parakeet Bay and The Basin. Ride 2 spans 10km, taking 1.5 to 3 hours, exploring Oliver Hill and Cathedral Rocks. Ride 3 is a 22km, 3 to 5-hour adventure covering the entire island. The map highlights these routes, ensuring riders discover stunning beaches, bays, and historical sites. Bike hire services are available, and riders are encouraged to wear helmets and carry water; These routes allow visitors to immerse themselves in Rottnest’s natural beauty while enjoying an active, eco-friendly experience.

4.3 Ferry and Bus Services

Rottnest Island is accessible via three ferry operators, with services departing from Perth, Hillarys Boat Harbour, and Fremantle. The ferry terminal is located near the main settlement, as shown on the map. The Island Explorer Bus offers a convenient hop-on-hop-off service, connecting key locations like Geordie Bay, Cape Vlamingh, and the lighthouse. Bus stops are marked on the map, ensuring easy access to accommodations, beaches, and attractions. Ferry and bus services operate regularly, making it simple for visitors to explore the island without a car. These services are ideal for travellers seeking a hassle-free way to experience Rottnest’s beauty;

Amenities and Services on the Island

The Rottnest Island map guides visitors to essential amenities, including dining, bike hire, and the Island Explorer Bus, ensuring a convenient and enjoyable stay for all visitors.

5.1 Dining and Refreshments

Rottnest Island offers a variety of dining options to suit every taste and preference. From casual beachside eateries to contemporary restaurants, visitors can enjoy fresh seafood and local flavors. The island’s dining spots are conveniently located near popular attractions, making it easy to refuel during your exploration. Many eateries are highlighted on the Rottnest Island map, ensuring you can plan your meals around your activities. Whether it’s a quick bite or a leisurely dinner, Rottnest’s dining scene provides a delightful culinary experience, complementing the island’s natural beauty and vibrant atmosphere.

5.2 Bike and Snorkel Hire

Bike and snorkel hire services on Rottnest Island are readily available, offering visitors the perfect way to explore both land and sea. Bikes are the most popular mode of transport, allowing easy access to secluded beaches and scenic trails. Snorkel hire provides the chance to discover the island’s vibrant marine life and coral reefs. Many hire shops are located near key locations marked on the Rottnest Island map, ensuring convenience for visitors. With affordable options and flexible rental periods, these services make it simple to enjoy the island’s natural beauty and create unforgettable memories during your stay.

5.3 Island Explorer Bus Stops

The Island Explorer bus provides a convenient way to explore Rottnest Island, with strategically placed stops across the island. These stops are clearly marked on the accommodation map, ensuring easy access to key locations such as beaches, historical sites, and popular attractions. Passengers can hop on and off at their leisure, allowing them to discover hidden bays, swim in pristine waters, or simply take in the breathtaking views. The bus service operates regularly, making it an ideal option for those who prefer a hassle-free way to experience all the island has to offer during their stay.

Special Experiences on Rottnest Island

Rottnest Island offers unique experiences, from swimming with tropical fish to meeting quokkas. Explore historical sites, enjoy water sports, and relax on secluded beaches, making every stay unforgettable.

6.1 Wildlife Encounters

Rottnest Island is renowned for its diverse wildlife, particularly the adorable quokkas, often called the world’s happiest animals. Visitors can interact with these unique marsupials in their natural habitat. The island also hosts a variety of seabirds, dolphins, and tropical fish, creating a haven for nature enthusiasts. Additionally, conservation efforts are in place to protect the island’s biodiversity, ensuring that future generations can enjoy these wildlife encounters. The accommodation map highlights areas where visitors can experience these encounters, making it easy to plan a wildlife-focused itinerary during their stay.

6.2 Historical Sites and Tours

Rottnest Island is steeped in rich history, offering numerous sites that reflect its Indigenous heritage and colonial past. Visitors can explore the Wadjemup Lighthouse, Oliver Hill Gun and Tunnel, and the Quod, a former Aboriginal prison. Guided tours provide insights into the island’s cultural and historical significance. The accommodation map helps locate these sites, enabling visitors to seamlessly integrate historical exploration into their stay. Understanding the island’s history enhances the overall experience, making it a memorable part of any visit to Rottnest.

6.3 Water Activities and Sports

Rottnest Island is a paradise for water enthusiasts, offering a variety of activities such as snorkeling, diving, and swimming in its crystal-clear waters. The island’s map highlights popular spots like The Basin and Parakeet Bay, perfect for exploring marine life. Visitors can also enjoy kayaking, paddleboarding, or even whale watching during specific seasons. With numerous bike rides mapped out, accessing these water sports is convenient. The island’s serene beaches and vibrant reefs make it an ideal destination for both relaxation and adventure, ensuring an unforgettable experience for all who visit.

Future Developments in Accommodation

Rottnest Island is planning upcoming accommodation projects, focusing on sustainability and modern comforts, ensuring a seamless blend with the island’s natural beauty and environmental goals.

7.1 Upcoming Projects

Rottnest Island is set to enhance its accommodation offerings with several upcoming projects. These include the refurbishment of existing units in Geordie Bay, which will modernize interiors, balconies, and courtyards, providing improved comfort for guests. Additionally, there are plans for eco-friendly developments, such as expanded glamping options, designed to align with the island’s sustainability goals. These initiatives aim to cater to diverse traveler preferences while preserving the island’s natural charm. The projects are expected to boost the island’s appeal, offering visitors more choices for their stays.

7.2 Sustainability Initiatives

Rottnest Island is prioritizing sustainability through various eco-friendly initiatives. The recent asbestos removal from accommodation sites highlights a commitment to safer, greener environments. Additionally, the refurbishment of the Quokka Arms Hotel with eco-conscious materials underscores efforts to reduce environmental impact. Future projects aim to incorporate renewable energy sources and waste reduction programs, ensuring that tourism growth aligns with conservation goals. These measures not only protect the island’s unique ecosystem but also promote responsible tourism, allowing visitors to enjoy the island’s beauty while contributing to its preservation.

7.3 Expansion of Accommodation Options

Rottnest Island is expanding its accommodation options to cater to growing visitor demand. New developments include eco-friendly lodging and upgraded facilities, ensuring a blend of comfort and sustainability. Future plans aim to diversify accommodation types, offering more luxury and budget-friendly choices. These expansions will enhance the island’s appeal while maintaining its natural charm. Upcoming projects focus on modernizing existing units and introducing innovative lodging concepts, such as eco-glamping, to attract a wider range of travelers. This growth ensures that Rottnest Island remains a premier destination, balancing tourism needs with environmental preservation and cultural heritage protection;

Practical Information for Visitors

Visitors can arrive via ferry, with services available from Perth and nearby ports. The island offers bike hire and an explorer bus for easy transport. Plan ahead and respect the environment to ensure a safe and enjoyable stay.

8;1 Getting to Rottnest Island

Rottnest Island is accessible via ferry services operated by three providers. Ferries depart from Perth, Hillarys Boat Harbour, and Fremantle, offering convenient options for visitors. The journey takes approximately 25–45 minutes, depending on the departure point. Ferry schedules vary, with frequent services during peak seasons. Advanced bookings are recommended, especially during holidays, as demand is high. Once on the island, visitors can explore using bikes or the Island Explorer bus. The island’s compact size makes it easy to navigate, ensuring a seamless start to your Rottnest getaway.

8.2 Getting Around the Island

Navigating Rottnest Island is effortless, with bikes being the most popular mode of transport. The island offers bike hire services, including pedal and electric options, allowing visitors to explore scenic trails and beaches. Alternatively, the Island Explorer bus provides a convenient hop-on-hop-off service, covering key locations such as popular bays and attractions. Walking is also a pleasant option for shorter distances; With clear signage and a comprehensive map, visitors can easily discover hidden gems and enjoy the island’s stunning landscapes at their own pace, making every journey an enjoyable part of the Rottnest experience.

8.3 Safety Tips and Guidelines

Respect Rottnest Island’s environment and wildlife by following essential safety guidelines. Keep a safe distance from animals, avoid feeding them, and secure food to prevent attracting wildlife. Swim only at patrolled beaches and be mindful of strong currents. Dispose of waste responsibly to protect the island’s ecosystem. Stay hydrated, wear sunscreen, and carry essentials when exploring. Familiarize yourself with emergency services and map locations. By adhering to these guidelines, you contribute to preserving Rottnest’s beauty and ensuring a safe, enjoyable experience for all visitors while maintaining the island’s natural heritage.

Planning Your Stay on Rottnest Island

Plan your stay using the accommodation map to explore bike routes, hidden beaches, and essential experiences like quokka interactions and snorkeling, ensuring a memorable visit.

9.1 Best Times to Visit

Rottnest Island is a year-round destination, but the best times to visit are during spring (September to November) and autumn (March to May) for mild weather and fewer crowds. Summer (December to February) is ideal for beachgoers, with warm days perfect for swimming and snorkeling. Autumn offers vibrant wildflowers and calm seas, while spring brings gentle breezes and wildlife spotting opportunities. High demand periods, like Christmas and school holidays, require early booking. Planning with an accommodation map ensures you make the most of your stay, whether exploring secluded bays or enjoying the island’s serene atmosphere.

9.2 Packing Essentials

When preparing for your Rottnest Island stay, pack lightweight, breathable clothing, swimwear, and a hat for outdoor adventures. Bring reef-safe sunscreen, sunglasses, and a reusable water bottle to stay hydrated. Include a first-aid kit, insect repellent, and a light jacket for cooler evenings. For snorkeling or biking, pack appropriate gear. Check your accommodation for provided items to avoid overpacking. Refer to the island map for nearby amenities to plan your essentials wisely, ensuring a comfortable and enjoyable stay amidst Rottnest’s stunning natural beauty.

9.3 Activity Planning and Itineraries

Plan your Rottnest Island itinerary by balancing relaxation and exploration. Start with popular activities like snorkeling at The Basin or biking to scenic bays. Use the island map to discover hidden gems and plan routes according to your fitness level. Allocate time for wildlife encounters, such as quokka selfies and whale watching (seasonal). Consider historical tours or the Oliver Hill Railway for cultural insights. Mix in downtime at your accommodation or beachside dining. Adjust your schedule based on ferry timings and seasonal events. With careful planning, you’ll experience the best of Rottnest’s natural beauty, history, and leisure activities.

Conservation Efforts on Rottnest Island

Rottnest Island prioritizes environmental and wildlife conservation through sustainable practices, ensuring the preservation of its natural beauty and unique ecosystems for future generations to enjoy and explore responsibly.

10.1 Environmental Protection Measures

Rottnest Island implements rigorous environmental protection measures to preserve its pristine ecosystems. Initiatives include removing asbestos from accommodations, reducing waste, and promoting sustainable practices. Refurbishments prioritize eco-friendly materials, ensuring minimal impact on the island’s natural beauty. The island’s conservation efforts focus on maintaining its unique biodiversity, with strict guidelines to protect flora and fauna. Visitors are encouraged to support these initiatives by adhering to eco-conscious tourism practices. The integration of sustainability into accommodation upgrades reflects the island’s commitment to balancing tourism with environmental stewardship, ensuring Rottnest remains a protected and thriving destination for future generations.

10.2 Wildlife Preservation Programs

Rottnest Island is renowned for its wildlife preservation efforts, particularly focusing on the protection of quokkas, the island’s iconic marsupials. Conservation programs ensure the health and safety of these animals, while educational initiatives promote awareness among visitors. Habitat restoration projects are also in place to safeguard vulnerable species. The island’s wildlife preservation programs are integral to maintaining its unique biodiversity and ensuring the quokkas continue to thrive. These efforts are supported by both local authorities and visitors, fostering a harmonious coexistence between wildlife and tourism. The island’s commitment to wildlife preservation underscores its dedication to environmental sustainability and eco-friendly tourism practices.

10.3 Visitor Responsibilities

Visitors to Rottnest Island play a crucial role in preserving its environment and wildlife. It is essential to adhere to guidelines such as disposing of waste properly, staying on designated paths, and not feeding quokkas. Respecting wildlife habitats ensures their safety and well-being. Visitors should also be mindful of noise levels to avoid disturbing the island’s natural tranquility. By taking these responsibilities seriously, guests contribute to the island’s conservation efforts and help maintain its pristine beauty for future generations. Responsible tourism practices are key to protecting Rottnest Island’s unique ecosystem and cultural heritage.

Rottnest Island offers a memorable experience with its stunning landscapes and diverse accommodations. Using the map ensures a well-planned stay, making it a must-have for every visitor to explore and enjoy the island seamlessly.

11.1 Summary of Key Points

Rottnest Island is a unique destination offering diverse accommodations, from luxury hotels to camping options. The island’s map is crucial for planning stays, highlighting key locations, bike routes, and amenities. With its pristine beaches, wildlife, and historical sites, Rottnest provides unforgettable experiences. Booking in advance is essential due to high demand, especially during peak seasons. The island’s commitment to sustainability ensures eco-friendly options for visitors. Whether seeking adventure or relaxation, Rottnest’s tailored accommodations and scenic beauty make it a must-visit destination in Western Australia.

11.2 Final Tips for a Memorable Stay

To ensure a memorable stay on Rottnest Island, plan ahead using the accommodation map to explore key locations and bike routes. Respect wildlife and conserve the environment to preserve the island’s natural beauty. Book early, especially during peak seasons, and take advantage of online platforms for seamless reservations. Engage in unique experiences like snorkeling, wildlife encounters, and historical tours. Pack essentials like sunscreen, swimwear, and a reusable water bottle. Lastly, embrace the island’s tranquility, immerse in its culture, and leave with unforgettable memories of this Western Australian gem.

dehydration urine color chart pdf

Dehydration occurs when the body loses more fluids than it consumes, disrupting normal bodily functions. Urine color serves as a visual marker of hydration status, ranging from pale yellow (well-hydrated) to dark amber (severely dehydrated). This guide explores the relationship between dehydration and urine color, providing a practical tool to monitor hydration effectively.

Understanding Dehydration

Dehydration occurs when the body loses more fluids than it takes in, disrupting essential bodily functions. It can range from mild to severe, with symptoms like dizziness, dry mouth, and reduced urine output. The body’s water balance is crucial for maintaining blood pressure, regulating temperature, and supporting organ function. Recognizing early signs of dehydration is vital, as prolonged fluid loss can lead to serious health complications. Monitoring urine color is a practical way to assess hydration status and prevent dehydration-related issues.

The Role of Urine Color in Assessing Hydration Levels

Urine color is a reliable indicator of hydration status, serving as a simple and non-invasive tool for quick assessment. Pale yellow or clear urine typically signifies proper hydration, while darker shades, such as amber or dark yellow, indicate dehydration. The concentration of waste products in urine increases with dehydration, darkening its color. This visual guide helps individuals monitor their hydration levels effectively, encouraging timely fluid intake to prevent complications. Regular use of a urine color chart can promote better health management and awareness.

How Urine Color Relates to Hydration

Urine color changes based on hydration levels, ranging from pale yellow (hydrated) to dark amber (dehydrated). Darker colors indicate concentrated urine, signaling the need for increased fluid intake.

Normal Urine Color and Hydration Levels

Normal urine color is typically pale yellow to straw-colored, indicating proper hydration. Clear urine suggests optimal fluid intake, while slightly darker shades may occur naturally; Consistent pale yellow urine throughout the day confirms good hydration levels. Well-hydrated individuals usually produce ample, light-colored urine. Maintaining this balance is essential for kidney function and overall health. Drinking 6-8 glasses of fluid daily helps preserve normal urine color and hydration status.

Abnormal Urine Colors and Their Implications

Abnormal urine colors, such as medium-dark yellow or amber, indicate varying degrees of dehydration. Medium-dark yellow suggests moderate dehydration, requiring increased fluid intake. Darker, strong-smelling urine signals severe dehydration, necessitating immediate hydration. Very dark or reddish urine may point to underlying medical conditions, such as kidney issues, and warrants medical consultation. Recognizing these colors helps identify dehydration levels and prompts appropriate actions to restore proper hydration and health.

Dehydration Urine Color Chart Overview

The Dehydration Urine Color Chart is a practical tool that uses urine color to indicate hydration levels, providing clear guidelines for assessing dehydration and taking corrective actions.

Key Features of the Dehydration Urine Color Chart

The chart provides a visual spectrum of urine colors, from pale yellow to dark amber, indicating hydration levels. It includes numbered categories (1-8) to assess dehydration severity. Colors 1-3 represent proper hydration, while 4-8 signal varying degrees of dehydration. The chart offers actionable advice, such as drinking water immediately for darker colors. It emphasizes that certain medications or conditions may alter urine color independently of hydration, making it a non-clinical tool for general use.

How to Interpret the Chart Effectively

To use the chart effectively, compare your urine color to the numbered categories. Colors 1-3 indicate normal hydration, while 4-8 suggest dehydration, with 7-8 requiring immediate attention. Note that factors like medications or diet can affect color. Use the chart alongside symptoms like thirst or fatigue for better accuracy. Regular checks help maintain hydration, especially in hot environments or during physical activity, ensuring timely interventions to prevent complications.

Stages of Dehydration and Corresponding Urine Colors

  1. Mild Dehydration: Slight darkening of urine to a light yellow hue, indicating a need to drink water.
  2. Moderate Dehydration: Urine turns medium-dark yellow, signaling increased fluid intake is necessary.
  3. Severe Dehydration: Urine becomes very dark and strong-smelling, requiring immediate hydration and medical attention if persistent.

Mild Dehydration (Slight Darkening of Urine)

Mild dehydration is indicated by a slight darkening of urine to a light yellow color. This suggests the body needs more fluids. Drinking a glass of water promptly can help restore hydration. If sweating or in a hot environment, consuming half a bottle (1/4 liter) of water within the hour is recommended. Early intervention prevents progression to more severe dehydration. Recognizing this stage is crucial for maintaining health and energy levels.

Moderate Dehydration (Medium-Dark Yellow Urine)

Moderate dehydration is signaled by medium-dark yellow urine. This indicates a higher concentration of waste products due to insufficient fluid intake. Drinking 2-3 glasses of water is advised to replenish fluids. If active or in hot conditions, increasing water intake further is essential. Ignoring this stage may lead to severe dehydration, causing symptoms like dizziness or fatigue. Addressing moderate dehydration promptly helps maintain bodily functions and overall well-being.

Severe Dehydration (Darker, Strong-Smelling Urine)

Severe dehydration is marked by very dark, strong-smelling urine, often accompanied by a reduction in volume. This indicates a critical need for immediate hydration. Drinking a large amount of water is essential, and medical attention should be sought if symptoms like dizziness, confusion, or rapid heartbeat occur. Untreated severe dehydration can lead to serious health complications, making prompt intervention crucial to restore proper hydration levels and prevent further harm to the body.

Practical Applications of the Urine Color Chart

The urine color chart is a practical tool for everyday hydration monitoring, sports activities, and medical assessments. It empowers individuals to manage their fluid intake effectively.

Everyday Use for Monitoring Hydration

Using a urine color chart daily helps individuals monitor their hydration levels effectively. By observing the color of their urine, people can determine if they are well-hydrated or need to drink more water. The chart provides a simple, non-invasive way to assess fluid balance, encouraging proactive hydration habits. It is particularly useful for individuals with busy lifestyles, athletes, or those working in hot environments, serving as a quick reference to maintain optimal hydration and prevent dehydration-related issues.

Use in Sports and Physical Activities

Athletes and individuals engaged in physical activities can benefit from using a dehydration urine color chart to monitor hydration levels. During intense workouts or sports, excessive sweating leads to fluid loss, increasing the risk of dehydration. By regularly checking urine color, athletes can assess their hydration status and take corrective measures, such as drinking water or electrolyte-rich fluids, to prevent performance decline and health risks associated with dehydration.

Use in Medical Settings for Quick Assessments

In medical settings, the dehydration urine color chart serves as a rapid assessment tool for healthcare professionals. By comparing a patient’s urine color to the chart, providers can quickly identify hydration levels and determine the severity of dehydration. This visual guide aids in making timely decisions for treatment, such as fluid intake recommendations or further medical interventions. Its simplicity and effectiveness make it a valuable resource for initial evaluations, especially in situations where more detailed diagnostic tools are unavailable.

Preventing Dehydration Through Awareness

Understanding the link between urine color and hydration levels can empower individuals to prevent dehydration. By monitoring changes in urine color, people can take proactive steps to stay hydrated and maintain optimal health.

Understanding Fluid Intake Recommendations

Understanding fluid intake recommendations is crucial for maintaining proper hydration. The general guideline is to drink 6-8 glasses of fluid daily, but needs vary based on activity level and environment. Using a dehydration urine color chart helps monitor hydration levels, ensuring fluids are consumed adequately. Adjustments may be needed for athletes or those in hot climates. Staying informed about fluid intake helps prevent dehydration and related health issues, promoting overall well-being and bodily function efficiency.

Recognizing Early Signs of Dehydration

Recognizing early signs of dehydration is essential for preventing severe complications. Common indicators include dry mouth, fatigue, dizziness, and reduced urine output. Dark or concentrated urine, as indicated by a dehydration urine color chart, signals the need for immediate hydration. Addressing these signs promptly by drinking water can help restore balance and prevent progression to more severe dehydration. Early recognition ensures timely intervention, promoting overall health and well-being.

Creating a Personal Hydration Plan

A personalized hydration plan helps maintain optimal fluid levels. Start by assessing daily needs based on activity, climate, and health. Use the dehydration urine color chart to monitor hydration and adjust intake accordingly. Set realistic goals, such as drinking 6-8 glasses of water daily, and incorporate reminders or tracking tools. Adjust for factors like exercise or heat exposure. Tailor strategies to individual preferences, ensuring habits align with lifestyle and environment for consistent hydration.

Factors Affecting Urine Color

Medications, supplements, and certain foods can alter urine color, independent of hydration. Conditions like liver or kidney issues may also change it, requiring medical evaluation.

Medications and Supplements Impact on Urine Color

Certain medications and supplements can change urine color, potentially masking dehydration signs. For example, riboflavin (vitamin B2) may turn urine bright yellow, while some antibiotics or diuretics can alter its shade. Always consider these factors when using a dehydration urine color chart. If unsure, consult a healthcare professional or pharmacist for clarification on how medications might affect urine color interpretations.

Dietary Influences on Urine Color

Diet plays a significant role in urine color, independent of hydration. Foods like beets, blackberries, and rhubarb can temporarily tint urine pink or red. B vitamins, particularly riboflavin, may cause a bright yellow hue. These changes can sometimes mimic or obscure signs of dehydration, making it essential to consider dietary factors when interpreting urine color charts for hydration assessment.

Medical Conditions That Alter Urine Color

Certain medical conditions can change urine color, potentially mimicking dehydration signs. For instance, liver disease may cause dark yellow or amber urine, while kidney issues can lead to foamy or blood-tinged urine. Urinary tract infections often result in cloudy or discolored urine. Additionally, conditions like diabetes or porphyria can alter urine color, sometimes resembling dehydration effects. Understanding these factors is crucial for accurate hydration assessment using urine color charts.

When to Seek Medical Attention

Seek immediate medical help if experiencing severe dehydration symptoms, such as very dark or cloudy urine, dizziness, or confusion. Unusual urine colors unrelated to dehydration or persistent symptoms require professional evaluation.

Severe Dehydration Symptoms Beyond Urine Color

Beyond dark urine, severe dehydration causes dizziness, confusion, rapid heartbeat, and low blood pressure. Symptoms may include sunken eyes, dry mouth, and reduced sweat production. In extreme cases, individuals may experience fainting or lack of urination. Immediate medical attention is crucial, as severe dehydration can lead to organ failure or shock if untreated. Recognizing these signs early is vital for preventing life-threatening complications.

Unusual Urine Colors Not Related to Dehydration

Unusual urine colors, such as red, blue, or green, are often unrelated to dehydration. Red urine may indicate blood, while blue or green hues can result from certain medications or foods like asparagus. Black urine could signal a medical condition like alkaptonuria. These colors are not typically linked to hydration levels but may require medical evaluation to rule out underlying health issues. Always consult a healthcare professional if unusual urine colors persist or cause concern.

Emergency Situations Involving Dehydration

In severe cases, dehydration can lead to life-threatening emergencies. Symptoms like very dark, cloudy urine, dizziness, rapid heartbeat, and confusion indicate critical dehydration. If urine matches the darkest colors on the chart (7-8), seek immediate medical attention. Vulnerable groups, such as children and the elderly, are at higher risk. In emergencies, drink water cautiously and rest in a cool place. Do not delay seeking help if symptoms worsen or urine remains extremely dark, as this can signal serious health complications requiring prompt intervention.

Benefits of Using a Dehydration Urine Color Chart

Severe dehydration can lead to emergencies, with symptoms like dark, cloudy urine, dizziness, and confusion. If urine matches the darkest colors on the chart (7-8), seek immediate medical help. Vulnerable groups, such as children and the elderly, are at higher risk. In emergencies, drink water cautiously and rest in a cool place. Do not delay seeking help if symptoms worsen or urine remains extremely dark, as this can signal serious health complications requiring prompt intervention.

Convenience and Ease of Use

A dehydration urine color chart is a simple, user-friendly tool that requires no special equipment or training. It provides a quick visual guide to assess hydration levels, making it accessible for everyone. The chart’s straightforward design allows individuals to compare their urine color to predefined categories, ensuring immediate feedback. This convenience empowers people to monitor their hydration status effortlessly, without the need for complex medical devices or professional supervision.

Empowering Individuals to Manage Hydration

The dehydration urine color chart places control in the hands of individuals, enabling them to take proactive steps toward maintaining optimal hydration. By providing clear, actionable guidelines, the chart fosters independence and self-awareness. Users can easily interpret their hydration status and make informed decisions about fluid intake, promoting better health outcomes without reliance on medical professionals. This empowerment is particularly beneficial for athletes, outdoor workers, and individuals with heightened hydration needs.

A Cost-Effective Tool for Health Monitoring

The dehydration urine color chart is an affordable and accessible resource for monitoring hydration levels. It eliminates the need for expensive medical equipment, providing a simple, visual guide that anyone can use. By enabling early detection of dehydration, it helps reduce healthcare costs associated with severe cases. The chart is often free or low-cost to print, making it a practical solution for individuals, schools, and workplaces to promote health and prevent dehydration-related issues effectively.

Creating a Dehydration Urine Color Chart

Design a chart with color gradients from pale yellow to dark amber, including descriptions for each shade. Print it on durable cardstock and laminate for long-term use. Add a key explaining hydration levels and recommended actions. This makes it a practical, reusable tool for daily hydration monitoring and education.

Designing an Effective Visual Guide

A dehydration urine color chart should feature a clear, gradient-style design with color samples ranging from pale yellow to dark amber. Each color corresponds to a hydration level, with descriptions indicating the severity of dehydration. Use large, easy-to-read text and ensure the chart is visually appealing. Include numbered markers for quick reference and a legend explaining each shade’s meaning. The design should be simple, intuitive, and durable for everyday use, helping users quickly assess their hydration status and take appropriate action.

Printing and Using the Chart for Daily Reference

Print the dehydration urine color chart on high-quality paper or cardstock for durability. Laminate it to protect against moisture and extend its lifespan. Keep the chart in an easily accessible location, such as on the fridge or in a bathroom. Use it daily to compare the color of your urine and assess hydration levels. Refer to the chart after urinating to monitor changes and take corrective action if signs of dehydration appear. This tool encourages consistent hydration monitoring and promotes early intervention to prevent severe dehydration. Ensure the chart is visible and convenient for regular use.

Heat-Related Illnesses and Dehydration

Dehydration is a key factor in heat-related illnesses, such as heat exhaustion and heat stroke. Monitoring urine color can help identify dehydration early, preventing severe complications in hot environments.

Recognizing Heat Exhaustion and Heat Stroke

Heat exhaustion and heat stroke are severe heat-related illnesses often linked to dehydration. Symptoms of heat exhaustion include heavy sweating, pale skin, and dizziness. If untreated, it can progress to heat stroke, characterized by high body temperature, confusion, and loss of consciousness. Monitoring urine color can help identify dehydration early, preventing these conditions. Dark or reduced urine output indicates dehydration, signaling the need for immediate hydration and rest in cool environments to avoid complications.

Using the Urine Color Chart in Hot Environments

In hot environments, the risk of dehydration increases due to excessive sweating. The urine color chart is a practical tool for assessing hydration levels in such conditions. By comparing urine color to the chart, individuals can determine if they are well-hydrated or need to drink more water. Darker urine colors indicate dehydration, while lighter shades suggest proper hydration; Regularly checking urine color in hot settings helps prevent heat-related illnesses and ensures timely fluid intake to maintain health and performance.

Hydration Tips for Different Age Groups

Children and the elderly need frequent hydration reminders, while adults and athletes should tailor intake to activity levels. Monitor urine color to ensure proper hydration for all ages.

Children and Elderly: Special Considerations

Children and the elderly are more vulnerable to dehydration due to higher water content in their bodies and potential difficulties in regulating fluids. Signs of dehydration in children include dry diapers, fewer tears, and irritability, while the elderly may exhibit dizziness or decreased urine output. Regularly monitoring urine color using a dehydration chart can help ensure proper hydration. Encourage children to drink water frequently, and assist elderly individuals in tracking their fluid intake and urine color to prevent complications.

Adults and Athletes: Tailored Hydration Strategies

Adults, especially athletes, require tailored hydration strategies to maintain optimal performance and health. The general recommendation is to drink 6-8 glasses of fluid daily, increasing for active individuals. Athletes should monitor urine color before and after workouts; pale yellow indicates proper hydration, while darker shades suggest the need for more fluids. Using a dehydration urine color chart helps track hydration levels effectively, ensuring peak performance and preventing complications. Adjust fluid intake based on activity level and environmental conditions for personalized hydration management.

Monitoring urine color is a simple, effective way to assess hydration levels and prevent dehydration. Regular use of the chart promotes health and ensures proper fluid balance.

Importance of Monitoring Urine Color for Health

Monitoring urine color is a simple yet effective way to track hydration levels and overall health. Pale yellow indicates proper hydration, while darker shades suggest dehydration. Factors like medications, diet, and medical conditions can influence urine color, but consistent monitoring helps identify patterns. By using a dehydration urine color chart, individuals can quickly assess their hydration status and take corrective actions. This practice promotes early detection of potential issues, ensuring timely interventions to maintain health and prevent complications.

Encouraging Regular Use of the Dehydration Urine Color Chart

Using a dehydration urine color chart regularly empowers individuals to monitor their hydration effectively. This simple, non-invasive tool helps identify early signs of dehydration, enabling proactive measures to maintain fluid balance. By incorporating the chart into daily routines, users can develop healthier hydration habits, reducing the risk of dehydration-related issues. Its ease of use and accessibility make it a valuable resource for promoting overall well-being and preventing heat-related illnesses in various settings.

Resources for Further Reading

Downloadable PDF versions of the dehydration urine color chart are available online, offering detailed guides and visual aids for monitoring hydration. Additional articles provide in-depth insights into maintaining optimal fluid balance and recognizing dehydration symptoms, making them valuable resources for further education and health management.

Downloadable PDF Versions of the Chart

Downloadable PDF versions of the dehydration urine color chart are widely available online, offering a convenient and shareable resource for monitoring hydration. These charts are often printable, making them ideal for daily reference or sharing with others. Many PDF versions include detailed color gradients, actionable recommendations, and clear guidelines to help individuals assess their hydration levels quickly. They serve as a practical tool for personal use or distribution in medical and educational settings, complementing articles on hydration and health.

Additional Articles on Hydration and Health

Explore additional articles that delve into hydration and health, offering in-depth insights beyond the dehydration urine color chart. These resources cover topics like understanding fluid intake needs, managing dehydration in specific populations, and the role of nutrition in maintaining hydration. They also discuss heat-related illnesses, exercise hydration strategies, and how certain medications affect urine color. These articles provide a comprehensive understanding of hydration health, helping readers make informed decisions to stay healthy and hydrated.

understanding rhetoric 3rd edition pdf free

Understanding Rhetoric 3rd Edition PDF Free: A Comprehensive Guide

This guide explores the Understanding Rhetoric 3rd Edition book, focusing on its unique comic-style visuals, engaging approach, and comprehensive coverage of writing and rhetorical theories. Authors Lunsford, Ruszkiewicz, and Walters deliver practical insights, making it a valuable resource for students and instructors. The book is published by Macmillan Learning and offers free PDF downloads through platforms like Open Library and Z-Library, providing accessible learning tools for academic success.

Understanding Rhetoric 3rd Edition introduces students to the core concepts of writing, argumentation, and rhetorical theory through a visually engaging format. This book, authored by Lunsford, Ruszkiewicz, and Walters, is designed to make complex ideas accessible and engaging for both students and instructors. The third edition builds on the success of its predecessors, offering a fresh perspective with its unique comic-style visuals. These visuals help readers grasp key rhetorical concepts in a dynamic and memorable way. The book emphasizes critical thinking, effective communication, and the practical application of rhetorical strategies. By blending theory with real-world examples, it creates a comprehensive resource for understanding rhetoric in various contexts. The free PDF version of this edition is widely sought after for its accessibility and educational value, making it a popular choice for academic use.

Key Features of the 3rd Edition

The 3rd Edition of Understanding Rhetoric offers several standout features that enhance learning and engagement. Its comic-style visuals break down complex rhetorical concepts into digestible, visually appealing content, making it easier for students to grasp key ideas. The book also provides a step-by-step guide to rhetorical analysis, enabling readers to critically evaluate texts and arguments effectively. Additionally, it includes practical applications for both students and instructors, offering real-world examples and exercises to apply theoretical knowledge. The free PDF download option makes this resource accessible to a broader audience, ensuring that learners can benefit from its comprehensive coverage of rhetoric and writing without financial barriers. These features collectively create a dynamic and interactive learning experience, setting the 3rd Edition apart from previous versions and similar textbooks.

The Unique Comic-Style Approach

The 3rd Edition of Understanding Rhetoric stands out with its unique comic-style approach, which transforms traditional rhetorical concepts into engaging, visually driven narratives. This innovative format uses graphics and illustrations to present complex ideas in an accessible and entertaining manner. By incorporating visual storytelling, the book helps students connect with the material on a deeper level, making abstract theories more tangible and memorable. This approach not only enhances understanding but also fosters a more enjoyable learning experience. The comic-style design is particularly effective for visual learners, ensuring that the content resonates with a diverse range of learning styles; This feature, combined with the availability of a free PDF download, makes the 3rd Edition a versatile and appealing resource for modern educators and students alike.

Authors and Publication Details

The Understanding Rhetoric 3rd Edition is authored by Lunsford, Ruszkiewicz, and Walters, and published by Macmillan Learning. This comprehensive guide to writing and rhetoric is widely available as a free PDF download.

Authors: Lunsford, Ruszkiewicz, and Walters

The Understanding Rhetoric 3rd Edition is authored by a team of renowned scholars: Andrea Lunsford, John Ruszkiewicz, and Keith Walters. Each brings unique expertise to the field of rhetoric and writing studies. Andrea Lunsford, a leading figure in rhetorical theory, has contributed significantly to understanding the evolving nature of communication. John Ruszkiewicz specializes in the intersection of rhetoric and multilingual writing, offering practical insights for diverse learners. Keith Walters adds depth with his focus on interdisciplinary approaches, blending rhetoric with cultural and linguistic studies. Together, they create a comprehensive guide that engages students through a comic-style format, making complex concepts accessible. Their collaborative effort ensures the book is both educational and visually appealing, providing a free PDF download for easy access to its wealth of knowledge on rhetoric, critical analysis, and argumentation. This edition is tailored for first-year college writers, offering tools for success in academic and real-world writing scenarios.

Publisher: Macmillan Learning

Macmillan Learning is the esteemed publisher of the Understanding Rhetoric 3rd Edition, ensuring high-quality educational resources. Known for innovative learning solutions, Macmillan supports both students and instructors with engaging materials. The publisher offers digital access, including free PDF downloads, making the book accessible for widespread use. Their platform integrates multimedia tools, enhancing the comic-style approach of Lunsford, Ruszkiewicz, and Walters. Macmillan Learning’s commitment to education is evident through resources like the Macmillan Community, which provides instructor support and structured course materials. This publisher’s dedication to blending traditional and modern learning methods ensures that Understanding Rhetoric remains a cornerstone in rhetorical education, offering practical applications for real-world communication and academic success. Their efforts make the book a valuable asset for first-year writers navigating the complexities of rhetoric and composition.

Advantages of the 3rd Edition

The 3rd Edition offers an engaging comic-style visual format, making complex rhetorical concepts accessible. It provides comprehensive coverage of writing and rhetoric, while practical applications support both students and instructors effectively, enhancing learning outcomes significantly.

Engaging Visual Format

The 3rd Edition of Understanding Rhetoric stands out with its unique comic-style visual format, which transforms complex rhetorical concepts into engaging, easy-to-follow narratives. This innovative approach captivates students, making the learning process interactive and enjoyable. The use of visuals, such as illustrations and graphic organizers, helps break down intricate theories, allowing learners to grasp key ideas more effectively. For instance, the book uses comics to explain rhetorical theory and criticism, making abstract concepts relatable. This format is particularly beneficial for visual learners, as it complements traditional text and enhances retention. The integration of images and text creates a dynamic learning experience, ensuring that students stay engaged while mastering core concepts of writing and rhetoric. The visual elements also provide practical examples, making the application of rhetorical principles more accessible and understandable for both students and instructors alike. This feature is a standout advantage of the 3rd Edition, setting it apart from traditional textbooks.

Comprehensive Coverage of Rhetoric and Writing

The 3rd Edition of Understanding Rhetoric provides an extensive exploration of both rhetorical theory and practical writing skills. It covers essential topics such as rhetorical theory, critical analysis, argumentation, and research methods, offering students a well-rounded understanding of effective communication. The book also delves into the writing process, including revision and editing techniques, to help learners refine their skills. Additionally, it incorporates discussions on reading strategies and the application of rhetoric in real-world scenarios. This comprehensive approach ensures that students gain both theoretical knowledge and practical tools to enhance their writing abilities. The inclusion of step-by-step guides and visual aids further supports learners in mastering complex concepts. By bridging the gap between theory and practice, the book serves as an invaluable resource for students and instructors seeking to deepen their understanding of rhetoric and writing.

Practical Applications for Students and Instructors

Understanding Rhetoric 3rd Edition offers a wealth of practical applications designed to enhance both teaching and learning experiences. For students, the book provides interactive exercises, real-world examples, and step-by-step guides to rhetorical analysis, enabling them to apply theoretical concepts in tangible ways. Instructors benefit from supplementary materials, including course structuring resources and assignment ideas, which facilitate engaging and effective lesson planning. The comic-style visuals and accessible language make complex ideas approachable, fostering active participation in class discussions. Additionally, the book’s focus on critical thinking and argumentation skills prepares students for academic and professional challenges. By integrating practical tools with theoretical insights, the 3rd Edition empowers both students and instructors to achieve their educational goals successfully. This dual focus ensures that the book remains a versatile and indispensable resource for rhetoric and writing education.

Platforms for Downloading Understanding Rhetoric 3rd Edition PDF

Popular platforms like Open Library and Z-Library offer free access to the Understanding Rhetoric 3rd Edition PDF. Additionally, the Macmillan Community provides official resources and support for instructors and students.

Open Library: A Reliable Source for Free eBooks

Open Library stands out as a trusted platform for accessing free eBooks, including the Understanding Rhetoric 3rd Edition PDF. With a vast collection of over 1 million titles, it offers a user-friendly interface for searching and downloading books. This platform is particularly valued for its commitment to making knowledge accessible to everyone, ensuring that students and educators can benefit from high-quality resources without cost. The Understanding Rhetoric 3rd Edition is prominently featured on Open Library, allowing users to download the PDF version seamlessly. Its comprehensive coverage of rhetoric and writing, combined with its engaging comic-style visuals, makes it a popular choice among learners. Open Library’s dedication to providing free academic materials ensures that this essential guide remains accessible to a wide audience, fostering education and critical thinking globally.

Z-Library: Access to Free Academic Resources

Z-Library is a renowned platform offering free access to a vast array of academic books, including the Understanding Rhetoric 3rd Edition PDF. Known for its extensive collection, Z-Library provides users with a user-friendly interface to search and download academic resources effortlessly. The platform is particularly popular among students and researchers due to its commitment to making knowledge accessible without cost. The Understanding Rhetoric 3rd Edition is readily available on Z-Library, allowing users to download the PDF version for free. This resource is invaluable for those seeking to explore rhetorical theory, critical analysis, and writing techniques. By offering free access to this essential guide, Z-Library supports academic pursuits and fosters a culture of learning. It serves as a reliable alternative for those who may not have access to paid resources, ensuring that educational materials remain widely accessible.

Macmillan Community: Official Resources and Support

Macmillan Community is the official platform offering comprehensive resources and support for the Understanding Rhetoric 3rd Edition. This platform provides free PDF downloads of the book, ensuring students and instructors have access to high-quality educational materials. The community also features detailed course structuring advice, making it easier for educators to integrate the book into their syllabi. Additionally, Macmillan Community offers a wealth of assignment ideas and class activities, fostering engaging and interactive learning experiences. By leveraging these resources, both students and instructors can maximize their understanding of rhetorical theory and writing techniques. The platform’s commitment to providing official support ensures that users receive accurate and reliable materials, enhancing their academic journey and fostering a deeper appreciation for the subject matter. This makes Macmillan Community an indispensable tool for anyone studying rhetoric.

Structure and Content of the Book

The Understanding Rhetoric 3rd Edition features a visually engaging format with core concepts, rhetorical theory, and a step-by-step guide to rhetorical analysis, making it a structured and comprehensive resource for learners.

Core Concepts of Writing and Rhetoric

The Understanding Rhetoric 3rd Edition delves into fundamental principles of writing and rhetoric, offering insights into the writing process, rhetorical theory, and the visual narrative style that enhances understanding. It explores key elements like audience awareness, purpose, and context, providing a solid foundation for effective communication. The book’s unique approach integrates visual and textual elements, making complex concepts accessible. Students learn to analyze and apply rhetorical strategies in various forms of writing, from arguments to narratives. Practical examples and exercises help bridge theory and practice, ensuring a deep grasp of rhetorical principles. This section is designed to empower learners with essential skills for clear, persuasive, and impactful writing in academic and real-world settings. The 3rd Edition emphasizes critical thinking and creativity, fostering a comprehensive understanding of rhetoric and its applications.

Rhetorical Theory and Criticism

The Understanding Rhetoric 3rd Edition provides a detailed exploration of rhetorical theory and criticism, offering insights into the art of persuasion and its historical development. The book examines key rhetorical theories, from classical approaches by Aristotle to modern interpretations, emphasizing their relevance in contemporary communication. It also delves into critical methodologies, enabling readers to analyze texts, speeches, and visual media effectively. The unique comic-style format makes complex theoretical concepts engaging and accessible, while practical exercises encourage application of these theories in real-world contexts. The section highlights the role of popular culture in shaping rhetorical understanding, using examples like The Hunger Games to illustrate key principles. This approach ensures students gain a robust understanding of rhetorical criticism and its practical applications in writing and communication. The 3rd Edition further enhances this section with updated examples and exercises, making it a valuable resource for both students and instructors.

Step-by-Step Guide to Rhetorical Analysis

The Understanding Rhetoric 3rd Edition includes a step-by-step guide to rhetorical analysis, equipping students with the tools to critically examine texts, speeches, and multimedia. This section breaks down the analysis process into manageable tasks, such as identifying the rhetorical situation, analyzing the audience, and evaluating the effectiveness of ethos, pathos, and logos. The book provides worksheets and exercises to apply these concepts, making complex analysis accessible. Real-world examples, including visual media and popular culture, are used to demonstrate how rhetorical strategies work in practice. Instructors can supplement this guide with additional resources from the Macmillan Community, offering structured activities for class discussions and assignments. This practical approach ensures students develop a deep understanding of rhetorical analysis, preparing them for advanced academic and professional communication. The guide is particularly praised for its clarity and engagement, making it a standout feature of the 3rd Edition.

Additional Resources and Support

The Understanding Rhetoric 3rd Edition offers instructor resources, assignment ideas, and course structuring tools through the Macmillan Community, ensuring comprehensive support for both students and educators. Z-Library and Open Library provide free access to the PDF, while the book’s step-by-step guide enhances rhetorical analysis skills; These resources foster engaging and effective learning experiences, making the 3rd Edition a valuable academic tool.

Instructor Resources and Course Structuring

The Understanding Rhetoric 3rd Edition provides instructors with a wealth of resources to enhance teaching and course design. Through the Macmillan Community, educators can access detailed guidance for structuring courses, including support for teaching with comics for the first time. The platform offers a robust set of assignment ideas, class activities, and downloadable materials tailored to the book’s content. These resources are designed to foster engaging and interactive learning environments, helping instructors create dynamic lesson plans. Additionally, the free PDF version of the book, available on platforms like Z-Library and Open Library, ensures easy access to course materials. The combination of visual and textual content makes it easier for students to grasp complex rhetorical concepts, while instructors benefit from structured tools to facilitate effective teaching.

Assignment Ideas and Class Activities

The Understanding Rhetoric 3rd Edition offers a variety of engaging assignment ideas and class activities to enhance student learning. These resources, available in the free PDF version, include rhetorical analysis worksheets, discussion prompts, and creative writing exercises. Instructors can use the book’s comic-style visuals to design visually oriented assignments, such as analyzing narrative structures or identifying rhetorical devices in graphic formats. Group activities encourage collaboration, while individual tasks help students apply rhetorical theories to real-world scenarios. The book also provides guidance on structuring debates, persuasive writing projects, and multimedia presentations. These activities are supported by downloadable materials from the Macmillan Community, making it easy for instructors to implement them. By integrating these resources, educators can create a dynamic and interactive learning environment that aligns with the book’s comprehensive approach to rhetoric and writing.

husqvarna 440 chainsaw manual

The Husqvarna 440 chainsaw is a reliable and efficient tool designed for both professional and occasional users. Known for its durability and performance, this chainsaw is ideal for various tasks such as felling small trees, limbing, and cutting firewood. It features a powerful combustion engine, making it suitable for demanding tasks while remaining user-friendly. The Husqvarna 440 is part of a series renowned for its innovative design and commitment to safety; With proper maintenance and operation, this chainsaw delivers consistent results, making it a popular choice among forestry workers and homeowners alike. Always refer to the operator’s manual for detailed instructions and safety guidelines to ensure optimal performance and safe operation.

1.1 Key Features

The Husqvarna 440 chainsaw is equipped with a range of features that make it a versatile and efficient tool for various cutting tasks. One of its standout attributes is its powerful 40.9 cc X-Torq engine, which delivers 2.4 horsepower. This engine is designed to provide consistent performance while minimizing emissions, making it environmentally friendly. The chainsaw also features a 16-inch bar and chain, which is ideal for cutting small to medium-sized trees and branches with precision.

Another key feature of the Husqvarna 440 is its lightweight design, weighing in at just 9.7 pounds (without the bar and chain). This makes it easy to maneuver, reducing operator fatigue during extended use. The ergonomic rear handle is designed for comfort and control, ensuring a secure grip even during demanding tasks. Additionally, the chainsaw is equipped with a robust clutch and a durable chain brake system, which enhances safety and prevents accidental starts.

The Husqvarna 440 also boasts a user-friendly design with features such as the Air Purge system, which simplifies starting the engine by removing air from the carburetor. The chainsaw is also fitted with a centrifugal air cleaning system, which prolongs the life of the engine by reducing dust and debris intake. Furthermore, the tool-free chain tensioning system allows for quick and easy adjustments, saving time and effort during operation.

Safety is a top priority with the Husqvarna 440, as it includes a low-kickback chain and a inertia-activated chain brake. These features work together to minimize the risk of kickback, a common hazard in chainsaw operation. The chainsaw also meets ANSI B175.1-2000 standards for low kickback saw chains, ensuring compliance with safety regulations. These safety features make the Husqvarna 440 a reliable choice for both professionals and occasional users.

1.2 Intended Use

The Husqvarna 440 chainsaw is primarily designed for forest work and cutting tasks, making it an excellent tool for both professionals and occasional users. Its robust design and powerful engine make it suitable for felling small trees, limbing, and cutting branches. This chainsaw is ideal for homeowners, landscapers, and forestry workers who need a reliable tool for managing wood and maintaining their properties.

The Husqvarna 440 is well-suited for cutting small to medium-sized trees, making it a great choice for firewood preparation, pruning, and clearing brush. Its lightweight design and balanced construction allow for precise control, even during extended use. The chainsaw is also capable of handling more demanding tasks, such as cutting larger logs, thanks to its powerful 40.9 cc engine and 16-inch bar and chain combination.

For professional users, the Husqvarna 440 is a versatile tool that can be used in a variety of settings, including construction sites, parks, and forests. Its durability and reliability make it a popular choice for tasks that require consistent performance. The chainsaw is also designed to be user-friendly, with features such as the Air Purge system and tool-free chain tensioning, which simplify maintenance and operation.

In residential settings, the Husqvarna 440 is perfect for homeowners who need to manage their property, including cutting firewood, trimming branches, and clearing debris. Its compact size and ease of use make it accessible to users who may not have extensive experience with chainsaws. However, it is important to note that the Husqvarna 440 is not intended for heavy-duty commercial use or cutting large, mature trees, as it may not have the power or durability required for such tasks;

The chainsaw is also designed to be used in conjunction with Husqvarna’s recommended bar and chain combinations, which are optimized for performance and safety. Using the correct bar and chain ensures that the chainsaw operates efficiently and minimizes the risk of kickback. The Husqvarna 440 is classified as a low-kickback saw when used with the H30 chain, making it a safer choice for users who are concerned about this potential hazard.

Overall, the Husqvarna 440 chainsaw is a versatile and reliable tool that is well-suited for a wide range of cutting tasks. Whether you are a professional looking for a dependable chainsaw for forest work or a homeowner needing to manage your property, the Husqvarna 440 is designed to deliver consistent performance and safety. Always refer to the operator’s manual for specific guidelines on usage and maintenance to ensure optimal results and prolong the life of the chainsaw.

Safety Precautions

Safety is paramount when operating the Husqvarna 440 chainsaw. Always wear approved personal protective equipment, including a protective helmet, hearing protection, and gloves, to minimize the risk of injury. Ensure the chainsaw is in good working condition, and never use it with a worn or damaged bar or chain. Kickback is a significant hazard, occurring when the guide bar tip contacts an object, causing a sudden upward motion. To prevent this, avoid contact with objects and use low-kickback chains like the H30; Keep bystanders at a safe distance and ensure proper footing. Refer to the operator’s manual for detailed safety guidelines to ensure safe and efficient operation.

2.1 Personal Protective Equipment

Protecting yourself while operating the Husqvarna 440 chainsaw is essential to prevent injuries and ensure safe operation. The proper use of personal protective equipment (PPE) is a critical step in maintaining safety. Always wear approved protective gear, as specified in the operator’s manual, to minimize the risks associated with chainsaw use.

Approved Protective Helmet: A protective helmet is a must-have when operating the Husqvarna 440. It safeguards your head from falling debris, branches, and potential kickback forces. Ensure the helmet meets safety standards and is securely fastened to provide maximum protection.

Approved Hearing Protection: Chainsaws generate significant noise, which can lead to hearing damage over time. Use ear protection, such as earplugs or earmuffs, that are designed to reduce noise levels. This will help preserve your hearing and allow you to work comfortably for extended periods.

Gloves: Gloves are vital for maintaining a firm grip on the chainsaw and protecting your hands from cuts, abrasions, and vibrations. Choose high-quality, chainsaw-specific gloves that provide both grip and protection without compromising dexterity.

Safety Glasses or Goggles: Protective eyewear is essential to shield your eyes from sawdust, debris, and other particles. Safety glasses or goggles with a wraparound design are recommended to ensure complete protection.

Protective Clothing: Wear long sleeves, sturdy pants, and closed-toe shoes to cover exposed skin. Consider using chainsaw-specific protective pants or chaps, which are designed to withstand chainsaw cuts and provide additional safety.

Regularly inspect your PPE for damage or wear and replace it as needed. Properly fitted and maintained protective equipment ensures optimal safety and comfort during operation. Always prioritize your safety by wearing the recommended PPE every time you use the Husqvarna 440 chainsaw.

By adhering to these guidelines, you can significantly reduce the risk of injury and enjoy a safer, more efficient cutting experience. Remember, safety should always be your top priority when working with power tools like the Husqvarna 440 chainsaw.

2.2 Understanding Kickback

Kickback is a sudden and violent reaction of the chainsaw that can occur during operation, posing a significant safety risk to the operator. It happens when the tip of the guide bar (the nose of the saw) comes into contact with an object, causing the chain to catch and react with tremendous force. This reaction can result in the chainsaw being thrust upward and backward, potentially leading to loss of control or injury.

The Husqvarna 440 chainsaw, like all chainsaws, is susceptible to kickback, especially during certain cutting techniques. Understanding the causes and mechanisms of kickback is crucial for safe operation. The primary cause of kickback is the contact of the guide bar tip with a solid object, such as a branch, knot, or another piece of wood. This contact creates a binding effect on the chain, causing it to stop abruptly while the engine continues to run, leading to the kickback reaction.

Another factor that can contribute to kickback is the type of chain being used. Chains with a higher cutting efficiency or aggressive cutting angles are more prone to kickback. Additionally, improper chain tensioning or a dull chain can increase the likelihood of kickback, as the chain may bind or catch more easily during the cutting process.

Recognizing the signs of impending kickback is essential. If the chainsaw begins to vibrate excessively or the chain slows down during a cut, it may indicate that the tip of the guide bar is approaching an object or that the chain is binding. In such situations, it is critical to stop the chainsaw immediately and assess the situation before proceeding.

To minimize the risk of kickback, the Husqvarna 440 chainsaw is equipped with a number of safety features, including a chain brake system. This system is designed to stop the chain almost instantly in the event of kickback, reducing the potential for injury; However, while these features enhance safety, they do not eliminate the risk entirely. Proper operator technique and awareness are still essential for safe operation.

Operators should always maintain control of the chainsaw by gripping both the front and rear handles firmly. This allows for better control and the ability to react quickly in the event of kickback. Additionally, keeping the chainsaw properly maintained, including regular sharpening of the chain and ensuring proper chain tension, can help reduce the likelihood of kickback.

Understanding kickback and taking steps to prevent it are fundamental aspects of operating the Husqvarna 440 chainsaw safely. By following the guidelines outlined in the operator’s manual and staying alert during operation, you can minimize the risks associated with kickback and ensure a safer working environment. Always remember that safety should never be compromised when working with power tools like the Husqvarna 440 chainsaw.

Technical Specifications

The Husqvarna 440 chainsaw is a gas-powered tool designed for efficiency and reliability. It features a 40.9 cc engine with a power output of 2.4 horsepower, making it suitable for cutting small trees and trimming branches. The chainsaw is equipped with a 16-inch bar and chain, providing ample cutting capacity for various tasks. Weighing approximately 9.7 pounds, it is lightweight and easy to maneuver. The Husqvarna 440 also includes features like the X-Torq engine, which reduces emissions and improves fuel efficiency. Additionally, the chainsaw is equipped with a chain brake system for enhanced safety. These specifications make the Husqvarna 440 a versatile and powerful tool for both residential and professional use.

3.1 Engine and Power

The Husqvarna 440 chainsaw is powered by a robust 40.9 cc two-stroke gasoline engine, delivering a maximum power output of 2.4 horsepower. This engine is designed to provide reliable performance for cutting small to medium-sized trees, limb branches, and handle other forestry tasks with ease. The X-Torq engine technology, a hallmark of Husqvarna chainsaws, is incorporated into the 440 model, ensuring efficient fuel consumption and reduced emissions. This eco-friendly design not only minimizes environmental impact but also enhances the overall cutting experience by providing consistent power delivery.

The engine features a cylinder displacement of 40.9 cm³, which strikes a balance between power and portability. Weighing in at approximately 4.3 kg (9.7 lbs) without the bar and chain, the Husqvarna 440 is lightweight and easy to maneuver, making it suitable for extended use without causing operator fatigue. The engine is equipped with a forged three-piece crankshaft, ensuring durability and smooth operation even under demanding conditions. Additionally, the chainsaw is fitted with a magnesium cylinder cover, which helps to dissipate heat efficiently, maintaining optimal engine performance during prolonged use.

The Husqvarna 440 chainsaw operates at a maximum engine speed of 14,000 RPM, providing the necessary torque and cutting efficiency for a wide range of tasks. The engine is also equipped with a centrifugal air cleaning system, which helps to extend the lifespan of the air filter by removing larger dust particles before they reach the filter. This feature is particularly useful for operators working in dusty environments, as it reduces the frequency of filter maintenance. Furthermore, the chainsaw is designed with a convenient air purge bulb, allowing users to easily start the engine by removing air from the carburetor and fuel system.

In terms of fuel efficiency, the X-Torq engine technology plays a crucial role in minimizing fuel consumption while maintaining high performance levels. This technology ensures that the engine burns fuel more cleanly and efficiently, reducing emissions and operational costs. The chainsaw is also equipped with a fuel pump, which simplifies starting the engine by delivering fuel to the carburetor, even after extended periods of storage. With a fuel tank capacity of 0.34 liters (11.5 fl oz), the Husqvarna 440 offers sufficient runtime for most residential and light professional tasks.

The power output of the Husqvarna 440 is complemented by its ability to handle a variety of bar and chain combinations. The chainsaw is compatible with bars ranging from 13 to 18 inches in length, allowing users to tailor the tool to their specific needs. Whether cutting firewood, pruning branches, or felling small trees, the Husqvarna 440 delivers the power and precision required for clean, efficient cuts. The engine’s ability to maintain consistent power under load ensures that the chain stays at optimal cutting speed, reducing the risk of binding and improving overall productivity.

complementary and supplementary angles worksheet pdf

Complementary angles sum to 90°, while supplementary angles sum to 180°․ These angle relationships are fundamental in geometry, aiding in solving problems and understanding spatial relationships effectively․

1․1 Definition of Complementary Angles

Complementary angles are two angles whose measures add up to 90 degrees․ When these angles are paired, they form a right angle․ For example, if one angle is 30°, the complementary angle would be 60°, since 30° + 60° = 90°․ These angles can be adjacent or non-adjacent but must always sum to 90 degrees․ Understanding complementary angles is crucial for solving geometry problems, as they often appear in triangles, right angles, and various spatial relationships․ Worksheets on complementary angles help students master this concept by providing exercises to identify and calculate missing angles, ensuring a strong foundation in angle relationships․

1․2 Definition of Supplementary Angles

Supplementary angles are two angles whose measures add up to 180 degrees․ When combined, they form a straight line․ For instance, if one angle is 70°, its supplementary angle would be 110°, as 70° + 110° = 180°․ These angles can be adjacent or non-adjacent but must always sum to 180 degrees․ Supplementary angles are essential in geometry, particularly in understanding linear pairs and solving problems involving straight lines․ Worksheets on supplementary angles provide exercises to identify and calculate missing angles, helping students grasp this fundamental concept․ By practicing these problems, learners develop a solid understanding of angle relationships, which is vital for more advanced geometric principles․

1․3 Importance of Understanding Angle Relationships

Mastering complementary and supplementary angles is crucial for building a strong foundation in geometry․ These concepts aid in solving complex problems, such as determining unknown angles in triangles and quadrilaterals․ Understanding angle relationships enhances spatial awareness and problem-solving skills, which are essential in various real-world applications, including architecture, engineering, and art․ Additionally, these skills are fundamental for advanced math topics like trigonometry and calculus․ Worksheets on complementary and supplementary angles provide structured practice, helping students apply these concepts confidently․ Regular practice ensures proficiency and prepares learners for higher-level mathematical challenges․

Key Concepts of Complementary Angles

Complementary angles are two angles whose measures add up to 90 degrees․ Understanding these relationships is essential for solving geometric problems and mastering angle-related concepts effectively․

2․1 What Are Complementary Angles?

Complementary angles are two angles whose measures add up to 90 degrees․ They are essential in geometry, aiding in solving problems and understanding spatial relationships effectively․ These angles can be adjacent or non-adjacent, but their sum is always 90 degrees․ For example, if one angle is 30 degrees, its complementary angle would be 60 degrees․ Recognizing complementary angles is crucial for various geometric applications, including triangle properties and trigonometry․ Worksheets on this topic help students practice identifying and calculating these angles, reinforcing their understanding of foundational geometric principles․

2․2 How to Identify Complementary Angles

Identifying complementary angles involves determining if two angles add up to 90 degrees․ Start by adding the measures of the angles in question․ If their sum equals 90 degrees, they are complementary․ For example, angles of 30° and 60° are complementary because 30 + 60 = 90․ Use angle addition to verify, and apply algebraic methods if one angle is unknown․ Worksheets often provide visual aids, such as diagrams, to help students recognize complementary angles․ Practice with various problems enhances understanding and improves skills in identifying these angle pairs accurately․ Regular practice using worksheets ensures mastery of this fundamental geometric concept․

2․3 Finding the Measure of a Missing Complementary Angle

To find the measure of a missing complementary angle, subtract the known angle from 90 degrees․ For instance, if one angle is 30°, the complementary angle is 60°, since 90 ⸺ 30 = 60․ Use algebraic equations to solve for unknown angles, ensuring the sum equals 90°․ Worksheets often include problems like finding the missing angle when one is given, reinforcing this concept․ By practicing these calculations, students develop fluency in identifying complementary angles and solving related problems efficiently․ Interactive activities and visual tools in worksheets further aid in mastering this skill, making it easier to apply in various geometric scenarios․

Key Concepts of Supplementary Angles

Supplementary angles sum to 180°, forming a straight line․ They are crucial for solving geometric problems and understanding spatial relationships, especially in linear pairs and straight angles․

3․1 What Are Supplementary Angles?

Supplementary angles are two angles whose measures add up to 180 degrees․ They form a straight line when combined, making them essential in geometry for solving problems involving straight angles, linear pairs, and adjacent angles․ These angles can be adjacent or non-adjacent, but their sum must always equal 180 degrees․ Understanding supplementary angles is crucial for various geometric concepts, such as solving linear equations and identifying angle relationships in triangles and quadrilaterals․ Worksheets on supplementary angles help students master this concept by providing practice in identifying and calculating missing angles, ensuring a solid foundation in angle relationships․

3․2 How to Identify Supplementary Angles

To identify supplementary angles, look for two angles whose measures add up to 180 degrees․ They can be adjacent, forming a straight line, or non-adjacent, as long as their sum equals 180°․ For example, angles of 100° and 80° are supplementary because 100 + 80 = 180․ When identifying, check if the angles form a straight line or if their measures total 180 degrees․ Worksheets often provide visual aids or algebraic expressions to practice this skill․ By recognizing supplementary angles, students can solve problems involving linear pairs and adjacent angles effectively․ Regular practice with worksheets helps reinforce this concept and improves geometric problem-solving abilities․

3․3 Finding the Measure of a Missing Supplementary Angle

To find the measure of a missing supplementary angle, subtract the known angle’s measure from 180 degrees․ For example, if one angle is 120°, the supplementary angle is 180° ⸺ 120° = 60°․ This method works for both adjacent and non-adjacent angles․ Worksheets often include problems where one angle is given, and students must calculate the missing angle using this subtraction technique․ In algebraic terms, if one angle is ( x ), the supplementary angle is ( 180° ⸺ x )․ Regular practice with worksheets helps students master this skill, which is essential for solving geometric problems involving linear pairs and real-world applications․ These exercises build a strong foundation for understanding angle relationships in geometry․

The Relationship Between Complementary and Supplementary Angles

Complementary angles sum to 90°, while supplementary angles sum to 180°․ Both relationships are essential for solving geometric problems and understanding angle properties in various mathematical contexts․

4․1 Differences Between Complementary and Supplementary Angles

Complementary angles add up to 90 degrees, while supplementary angles sum to 180 degrees․ Complementary angles are smaller and often used in right-angle scenarios, such as in triangles․ Supplementary angles, being larger, form straight lines and are commonly found in geometry problems involving parallel lines or linear pairs․ The key difference lies in their totals and applications․ For example, if one angle in a complementary pair is 30°, the other is 60°, whereas in a supplementary pair, if one angle is 100°, the other is 80°․ Understanding these distinctions is crucial for solving problems involving angle relationships in geometry and trigonometry․ Worksheets often highlight these differences to help students classify and compute angles accurately․

4․2 How Complementary and Supplementary Angles Relate to 90 and 180 Degrees

Complementary angles are two angles whose measures add up to 90 degrees, forming a right angle․ Supplementary angles, in contrast, are two angles whose measures sum to 180 degrees, creating a straight line․ These relationships are fundamental in geometry, as they allow for the calculation of missing angles by subtracting the known angle from 90° or 180°․ For example, if one angle in a complementary pair is 30°, the other is 60°, while in a supplementary pair, if one angle is 120°, the other is 60°․ These concepts are essential for solving problems involving angle relationships in various geometric shapes and real-world applications, making them a cornerstone of geometry education․

Using Worksheets to Practice Complementary and Supplementary Angles

Worksheets are essential for mastering complementary and supplementary angles, offering various problems and interactive tools to enhance understanding and retention of these geometric concepts effectively․

5․1 Benefits of Using Worksheets for Angle Practice

Worksheets provide structured practice, enhancing understanding of complementary and supplementary angles through interactive exercises․ They offer a variety of problems, reinforcing concepts like classifying angles and solving for unknowns․ By engaging with these materials, students develop problem-solving skills and build confidence in geometry․ Worksheets also serve as valuable resources for self-assessment and review, helping learners identify areas for improvement․ Their clear format ensures focused learning, making complex angle relationships more accessible and manageable for students of all skill levels․

5․2 Types of Problems Found in Worksheets

Worksheets on complementary and supplementary angles feature diverse problem types․ Common exercises include classifying angle pairs, solving for missing angles using subtraction from 90° or 180°, and algebraic equations․ Students practice identifying complementary, supplementary, or neither relationships, enhancing their understanding of angle properties․ Some problems involve linear pairs and vertical angles, while others focus on real-world applications․ Interactive diagrams and visual aids further support comprehension․ These varied exercises cater to different learning styles, ensuring comprehensive mastery of angle relationships․ Regular practice with these problems builds fluency and confidence in geometry skills․

5․3 Tips for Completing Worksheets Effectively

To complete worksheets on complementary and supplementary angles effectively, start by understanding the definitions and relationships between angles․ Begin with basic problems to build confidence, then progress to more complex ones․ Use visualization techniques, such as drawing diagrams, to better grasp angle pairs․ Always check your work by adding angles to ensure they sum to 90° or 180°, as appropriate․ Utilize online tools or apps for interactive practice and immediate feedback․ Regularly review mistakes to avoid repeating them․ Lastly, practice consistently to reinforce concepts and improve problem-solving skills․ These strategies will help you master complementary and supplementary angles efficiently․

Solving Problems Involving Complementary and Supplementary Angles

Start by identifying if angles are complementary (sum to 90°) or supplementary (sum to 180°)․ Add given angles to classify them․ To find a missing angle, subtract the known angle from 90° or 180°․ Use algebra to solve equations involving unknowns․ Verify solutions by ensuring the sum matches the required total․ Practice with various problems to enhance accuracy and efficiency․

6․1 Classifying Angle Pairs as Complementary, Supplementary, or Neither

To classify angle pairs, start by adding their measures․ If the sum is 90°, they are complementary․ If the sum is 180°, they are supplementary․ If neither condition is met, they are neither․ For example, angles of 30° and 60° are complementary, while 120° and 60° are supplementary․ When angles are adjacent and form a straight line, they are supplementary․ Use this method to classify pairs in worksheets․ Practice with various problems to improve accuracy․ Ensure to check if angles add up correctly or if they form a straight line․ This skill is essential for solving more complex geometry problems․ Regular practice helps in mastering angle classification quickly․

6․2 Solving for Unknown Angles in Algebraic Equations

Solving for unknown angles in algebraic equations involves using the properties of complementary and supplementary angles․ If two angles are complementary, their measures add up to 90°, so you can set up an equation like ( x + 30° = 90° ) and solve for ( x )․ For supplementary angles, their sum is 180°, so an equation like ( x + 45° = 180° ) can be used․ To find the unknown angle, isolate ( x ) by subtracting the known angle from the total․ For example, if ( x + 30° = 90° ), subtract 30° from both sides to get ( x = 60° )․ Practice with various problems to master this skill, ensuring accuracy in setting up and solving equations․ This method is versatile and applies to both simple and complex angle problems, making it a valuable tool in geometry․ Regular practice enhances problem-solving speed and confidence․

6․3 Applying Angle Relationships in Real-World Scenarios

Understanding complementary and supplementary angles is essential for real-world applications․ In construction, these angle relationships help in designing structures like staircases and roofs, ensuring stability and proper alignment․ For instance, a staircase’s angle must complement the adjacent wall to fit perfectly․ In photography, knowledge of angles aids in framing shots, using supplementary angles to capture wide scenes․ Additionally, in sports like basketball, players use supplementary angles to calculate trajectories for accurate shots․ These practical uses highlight the importance of mastering angle relationships․ Worksheets provide exercises that mimic real-life problems, enabling students to apply their knowledge effectively․ By solving these, learners develop problem-solving skills that are valuable beyond the classroom, making geometry a tool for everyday challenges and creative solutions․

Advanced Topics in Angle Relationships

Exploring linear pairs and vertical angles enhances understanding of supplementary angles․ These concepts are crucial in geometry, offering insights into more complex spatial relationships and problem-solving strategies․

7․1 Understanding Linear Pairs and Their Relationship to Supplementary Angles

A linear pair consists of two adjacent angles that form a straight line, adding up to 180 degrees․ This makes them a type of supplementary angles․ Understanding linear pairs is essential in geometry, as they often appear in real-world applications like constructing straight lines or solving puzzles․ Linear pairs can be used to find missing angles in geometric figures, making them a valuable tool for problem-solving; Additionally, recognizing linear pairs helps in identifying other supplementary angles, as they share the same total measure․ Worksheets and diagrams are effective resources for practicing and visualizing these concepts, ensuring a strong foundation in angle relationships․

7․2 Exploring Vertical Angles and Their Properties

Vertical angles are pairs of opposite angles formed by intersecting lines․ They are equal in measure and often appear in geometric problems․ Unlike complementary or supplementary angles, vertical angles do not necessarily add up to a specific degree measure unless they form a linear pair․ Their key property is that they are always congruent, making them useful in solving complex angle problems․ Worksheets often include exercises to identify and calculate vertical angles, helping students understand their role in geometry․ Recognizing vertical angles is crucial for mastering angle relationships and applying them in real-world scenarios, such as designing structures or analyzing spatial arrangements․

7․3 The Role of Complementary and Supplementary Angles in Geometry

Complementary and supplementary angles are essential in geometry for solving problems and understanding spatial relationships․ They help in identifying missing angles in triangles, quadrilaterals, and other polygons․ For instance, knowing that the angles in a triangle sum to 180° often involves supplementary angles․ These concepts are also crucial in trigonometry and coordinate geometry․ Worksheets on complementary and supplementary angles provide practical exercises to master these skills, such as classifying angles, solving algebraic equations, and applying them to real-world scenarios like architecture and engineering․ By grasping these angle relationships, students can better analyze and solve complex geometric problems, making them foundational tools in mathematical problem-solving․

Resources for Further Practice

Utilize complementary and supplementary angles worksheets, online tools, and interactive activities to enhance understanding and mastery of angle relationships through practical exercises and real-world applications․

8․1 Recommended Worksheets for Complementary and Supplementary Angles

Recommended worksheets for practicing complementary and supplementary angles include resources from Math-Drills, such as “Complementary and Supplementary Angle Relationships with Rotated Diagrams․” These worksheets offer a variety of problems, including classifying angle pairs, solving for missing angles, and applying algebraic skills․ Additionally, Cuemath and other educational platforms provide interactive worksheets that cater to different grade levels, ensuring a comprehensive understanding․ Many worksheets, like “Missing Measures: Complementary and Supplementary Angles,” focus on finding unknown angles by subtracting from 90° or 180°․ They often include visual diagrams and step-by-step instructions, making them ideal for both classroom and home use․ These resources are available in PDF formats for easy printing and are designed to reinforce key concepts effectively․

8․2 Online Tools and Interactive Activities for Angle Practice

Online tools like Math-Drills and Cuemath offer interactive activities to practice complementary and supplementary angles․ These platforms provide visual aids, such as rotated diagrams and angle models, to help students understand concepts better․ Interactive worksheets with real-time feedback are also available, allowing learners to track their progress․ Tools like GeoGebra enable students to explore angle relationships dynamically, while Khan Academy offers practice exercises with step-by-step solutions․ These resources make learning engaging and accessible, catering to different learning styles․ By leveraging technology, students can grasp angle relationships more effectively and build a strong foundation in geometry․ These tools are particularly useful for reinforcing concepts learned from worksheets and for self-paced learning․

8․3 Additional Tips for Mastering Angle Relationships

To excel in understanding complementary and supplementary angles, consistent practice is essential․ Utilize a variety of resources, such as worksheets, online tools, and interactive activities, to reinforce learning․ Break down problems into smaller steps, focusing on one concept at a time․ Visualizing angles with diagrams helps in grasping relationships more effectively․ Regularly reviewing concepts and seeking feedback from educators or peers can enhance understanding․ Incorporating real-world examples, like measuring angles in everyday objects, makes learning more relatable and engaging․ Staying organized and maintaining a dedicated study routine also aids in mastering these fundamental geometry skills․ By combining these strategies, students can build a solid foundation and improve their problem-solving abilities in angle relationships․ This approach ensures long-term retention and confidence in tackling more complex geometric challenges․

Mastering complementary and supplementary angles is crucial for geometry․ Regular practice with worksheets and online tools ensures proficiency․ Keep exploring and practicing to excel in angle relationships․

9․1 Summary of Key Concepts

Complementary angles add up to 90°, while supplementary angles sum to 180°․ These relationships are essential for solving geometric problems and understanding angle properties․ Worksheets and interactive tools are invaluable for mastering these concepts․ By practicing with various problems, students can classify angles, find missing measures, and apply these relationships in real-world scenarios․ Regular practice strengthens foundational skills, enabling better performance in geometry and related fields․ The consistent use of resources like worksheets and online activities ensures long-term understanding and proficiency in complementary and supplementary angles․

9․2 Encouragement for Continued Practice

Consistent practice is crucial for mastering complementary and supplementary angles․ Utilize worksheets and online tools to reinforce these concepts and build confidence․ Regular engagement with problems helps improve problem-solving skills and deepens understanding․ Encourage students to explore interactive activities and real-world applications to make learning enjoyable․ By dedicating time to practice, learners can overcome challenges and excel in geometry․ Celebrate progress, no matter how small, to maintain motivation and foster a growth mindset․ Remember, practice is the key to proficiency, and persistence leads to success․

sl3000ul manual

Welcome to the LiftMaster SL3000UL manual, your guide to understanding and operating this advanced slide gate operator. Designed for UL325 compliance, it offers MyQ and Security 2.0 compatibility, ensuring seamless integration and enhanced safety features. This manual covers installation, operation, and maintenance tips to maximize performance and longevity. Refer to the official LiftMaster website for additional resources and support.

Overview of the SL3000UL Operator

The LiftMaster SL3000UL is a high-traffic commercial slide gate operator designed for heavy-duty applications. Available in 1/2 and 1 HP AC configurations, it supports gates up to 50 feet and 1,000 lbs, making it ideal for demanding environments. This operator features MyQ and Security 2.0 compatibility, enabling smart home integration and advanced security protocols. Built for reliability and durability, the SL3000UL is UL325 compliant, ensuring safe and efficient operation; Its robust design and cutting-edge technology make it a top choice for commercial and industrial settings.

Importance of Reading the Manual

Reading the SL3000UL manual is essential for safe and effective operation. It provides critical safety guidelines, installation steps, and maintenance tips to ensure compliance with UL325 standards. Understanding the manual prevents accidents, avoids equipment damage, and ensures proper functionality. It also highlights troubleshooting solutions and advanced features like MyQ Technology and Security 2.0. Referencing the manual regularly helps users optimize performance and address issues promptly. Always follow the instructions carefully to maximize the operator’s longevity and reliability in high-traffic environments.

Key Features of the SL3000UL

The SL3000UL offers robust performance with 1/2 and 1 HP options, ideal for heavy-duty gates up to 50 feet and 1,000 lbs. It features MyQ Technology for smartphone control and Security 2.0 for enhanced protection. Designed for high-traffic commercial use, it ensures reliable operation. The manual outlines these features to help users maximize functionality and integrate seamlessly with compatible accessories. Regular updates and technical support ensure optimal performance and safety, making the SL3000UL a top choice for secure and efficient gate operation in demanding environments.

Safety Instructions and Precautions

Always read the manual thoroughly and follow all safety instructions before operating. Ensure proper understanding to avoid accidents and maintain a safe environment.

General Safety Guidelines

Always read the manual thoroughly before installation or operation. Ensure the gate is used exclusively for vehicles, with a separate pedestrian access point. Avoid operating the gate in hazardous conditions. Regularly inspect the system for wear and tear. Keep loose clothing and jewelry away from moving parts. Never attempt repairs without proper training. Ensure all safety sensors are functioning correctly. Follow all local regulations and standards. Only authorized personnel should perform maintenance or adjustments. Keep children away from the gate during operation.

Warnings and Cautions

Warning: Do not attempt installation without proper training. Caution: Misuse can cause injury or damage. Important: Always disconnect power before servicing. Note: Failure to follow guidelines may void warranty. Ensure all moving parts are clear of obstructions. Never bypass safety features. Regular maintenance is crucial for optimal performance. Be aware of potential pinch points during operation. Keep the area clear of debris and obstacles. Always test the gate after repairs or adjustments. Follow all safety instructions provided in this manual to ensure safe and reliable operation of the SL3000UL gate operator.

Emergency Procedures

In case of an emergency, disconnect power immediately to prevent further issues. Use the manual release mechanism to open or close the gate safely. Evacuate the area if the gate malfunctions or shows signs of instability. Contact a professional technician without delay to assess and repair any damage. Never attempt to force the gate open or closed, as this can cause further damage or injury. Refer to the manual for specific emergency release instructions and ensure all safety protocols are followed to maintain operator integrity and user safety. Always prioritize caution and seek professional assistance when needed.

Installation of the SL3000UL

Install the SL3000UL according to the manual to ensure proper function. Check compatibility with MyQ and Security 2.0 features. Follow safety guidelines and consult a professional if needed.

Pre-Installation Checklist

Before installing the SL3000UL, ensure compliance with UL325 standards and verify gate weight and size. Check MyQ compatibility and Security 2.0 features. Confirm power supply availability and ensure the gate is balanced. Verify all hardware and accessories are included. Consult a certified installer for complex setups. Review local building codes and safety regulations. Ensure proper grounding and wiring. Read the manual thoroughly to understand installation requirements. Confirm the correct part number for the Motor Drive Board (K1D8402-1CC). Ensure compatibility with Security 2.0 accessories for enhanced functionality.

Step-by-Step Installation Process

Begin by assembling the SL3000UL operator according to the manual. Mount the unit securely to the gate post, ensuring proper alignment. Connect the electrical components, including the motor and control board. Install safety sensors and accessories like MyQ and Security 2.0 devices. Follow wiring diagrams carefully to avoid errors. Test the operator’s basic functions before full installation. Ensure all bolts and screws are tightened properly. Refer to the manual for specific torque settings. Finally, perform a safety test to verify smooth operation and compliance with UL325 standards.

Post-Installation Checks

After installing the SL3000UL, perform a thorough inspection to ensure all components are securely fastened. Test the gate’s smooth operation, checking for proper alignment and balance. Verify that all safety sensors and accessories, such as MyQ and Security 2.0 devices, are functioning correctly. Conduct a manual override test to ensure the gate can be operated safely in case of power failure. Inspect electrical connections for tightness and integrity. Review the manual for specific post-installation checks to confirm compliance with UL325 standards and optimal performance.

Special Installation Considerations

Ensure the gate operator is installed on vehicle gates only, with a separate pedestrian access point. Verify gate weight and size align with the operator’s capacity, up to 50ft and 1,000 lbs for 1/2 HP models. Check for proper alignment and balance to prevent uneven wear. Ensure all MyQ and Security 2.0 accessories are compatible and configured correctly. Inspect the site for potential obstructions or hazards. Follow UL325 standards strictly, especially for safety sensors and entrapment protection. Consult the manual for specific considerations based on gate type and installation location.

Operating the SL3000UL

Ensure smooth operation by following safety guidelines and using MyQ Technology for remote monitoring. Regularly test Security 2.0 features and adjust settings as needed for optimal performance.

Basic Operation Overview

Begin by familiarizing yourself with the SL3000UL’s controls and features. Start the operator using the provided remote or wall control. Ensure the gate moves smoothly and stops correctly. Use MyQ Technology for remote monitoring and operation via your smartphone. Always follow safety guidelines and test Security 2.0 features regularly. For daily use, perform quick checks on sensors and wiring. Troubleshoot minor issues like misalignment or obstructions promptly to ensure reliable performance. Refer to the manual for detailed troubleshooting steps and maintenance tips.

Advanced Operational Features

The SL3000UL offers advanced features like MyQ Technology for smartphone integration and remote monitoring. Security 2.0 provides enhanced protection with rolling code encryption. Customize operation settings for tailored functionality, including programmable gate speeds and sensitivity adjustments. Use the compatible accessories to integrate with smart home systems for seamless control. Schedule operations and monitor activity logs for added convenience. These features ensure a secure, efficient, and personalized user experience, making the SL3000UL a top choice for modern gate automation needs.

Daily Use and Maintenance Tips

Regularly inspect the gate and operator for wear and tear. Lubricate moving parts annually to ensure smooth operation. Check and tighten loose screws or bolts. Clean photo-eye sensors to prevent obstruction. Test the emergency release handle monthly. Keep the control box dry and free from debris. Follow the recommended maintenance schedule in the manual. These steps ensure optimal performance and extend the lifespan of your SL3000UL operator. Refer to the manual for detailed maintenance procedures and guidelines.

Troubleshooting Common Issues

If the gate fails to move, check the power supply and ensure the operator is properly connected. Verify that photo-eye sensors are clean and aligned. If the gate reverses unexpectedly, adjust the safety sensors or check for obstructions. For error codes, consult the manual or reset the system. Lubricate moving parts if operation is noisy. Ensure the gate is balanced and aligned correctly. If issues persist, refer to the troubleshooting guide in the manual or contact a certified technician for assistance.

Maintenance and Repair

Regular maintenance ensures optimal performance. Check and lubricate moving parts, inspect sensors, and replace wearable components as needed. Schedule annual professional inspections for longevity and safety.

Regular Maintenance Schedule

Perform monthly checks on moving parts, ensuring proper lubrication to prevent wear. Inspect safety sensors and test gate balance. Replace batteries in remotes and clean tracks. Schedule annual professional inspections for motor and gear examination. Check all safety features and ensure compliance with UL325 standards. Regularly monitor wear on chains or belts and replace as needed. Keep the gate area clear of debris for smooth operation; Refer to the manual for detailed schedules and guidelines to maintain optimal functionality and safety.

Replacing Wearable Parts

Replace wearable parts like chains, belts, and bearing rollers when worn or rusted. Lubricate moving components regularly to extend lifespan. Inspect and replace safety sensors if faulty. Check the manual for specific part numbers and replacement instructions. Always disconnect power before starting repairs. Wear protective gear and use proper tools. If unsure, consult a professional technician. Keep a maintenance log to track replacements and ensure compliance with safety standards. Timely replacements prevent unexpected malfunctions, ensuring smooth and reliable gate operation. Refer to the manual for detailed guidelines on replacing specific components safely and effectively.

Diagnosing and Fixing Common Problems

Identify common issues like uneven gate movement or sensor malfunctions by checking error codes in the manual. Ensure proper alignment of safety sensors and clean them regularly. If the gate stops mid-operation, inspect for obstructions or worn chains. Power cycle the system to reset it if unresponsive. For persistent issues, refer to the troubleshooting section or contact LiftMaster support. Always follow safety guidelines when diagnosing and fixing problems to avoid accidents or further damage.

When to Call a Professional

If you encounter complex issues beyond basic troubleshooting, such as persistent error codes or severe mechanical damage, contact a certified LiftMaster professional. Issues requiring specialized tools or advanced technical knowledge, like circuit board repairs, should be handled by experts to avoid further damage. Additionally, if you’re unsure about safety protocols or proper repair procedures, seek professional assistance to ensure compliance with UL325 standards and maintain warranty validity. Always refer to LiftMaster’s official support resources for trusted service.

Advanced Features and Settings

  • MyQ Technology allows remote monitoring and control via smartphone apps.
  • Security 2.0 provides enhanced encryption for secure operation.
  • Customizable settings optimize gate performance for heavy-duty applications.

MyQ Technology Integration

The SL3000UL seamlessly integrates with MyQ Technology, enabling remote monitoring and control of your gate operator through the MyQ app. This feature allows users to receive notifications, grant access to guests, and monitor gate activity from anywhere. MyQ Technology enhances convenience and security, ensuring that your gate operates intelligently and efficiently. Compatible with Security 2.0, it provides an advanced, secure connection for reliable performance. Visit LiftMaster.com for detailed setup instructions and troubleshooting guides.

Security 2.0 Features

The SL3000UL incorporates advanced Security 2.0 features, designed to enhance protection and reliability. These include secure communication protocols to prevent unauthorized access and advanced encryption for data protection. Security 2.0 ensures that only authenticated devices can control the gate operator, providing an additional layer of safety. This technology integrates seamlessly with MyQ, offering real-time monitoring and notifications. The system is built to withstand potential vulnerabilities and ensure uninterrupted operation. For detailed setup and troubleshooting, refer to the manual or contact LiftMaster support.

Customizing Operation Settings

Customizing operation settings on the SL3000UL allows tailored functionality to meet specific needs. Users can adjust sensitivity, timing, and activation parameters through the control panel or MyQ app. Advanced features like customizable delay times and sensor sensitivity ensure smooth operation. The manual provides step-by-step guidance for personalizing settings while maintaining safety and efficiency. Regular updates via the MyQ platform ensure optimal performance and compatibility with the latest technologies. Always refer to the manual for detailed instructions to avoid configuration errors and maintain system integrity. Proper customization enhances user experience and gate reliability.

Troubleshooting and Error Codes

Identify common issues like sensor malfunctions or power outages. Refer to error codes in the manual for specific solutions. Resetting the system often resolves operational glitches.

Common Error Codes and Solutions

Common error codes for the SL3000UL include E01, E02, and E03, often indicating issues like sensor obstructions or power supply problems. E01 typically signifies a gate position sensor malfunction, while E02 points to a safety beam interruption. E03 may indicate a communication error between components. To resolve these, ensure sensors are clean and properly aligned, check power connections, and restart the system. If issues persist, consult the troubleshooting section or contact LiftMaster support for professional assistance. Regular maintenance can help prevent these errors.

Resetting the System

To reset the SL3000UL, first ensure the gate is in the closed position. Disconnect the power supply, then press and hold the reset button located on the control board for 10 seconds. Reconnect power and allow the system to reboot. This process clears minor glitches and restores default settings. If issues persist after resetting, refer to the troubleshooting guide or contact customer support for further assistance. Regular resets can help maintain optimal performance and ensure smooth operation of your gate system. Always follow safety precautions when performing resets.

Advanced Diagnostic Techniques

For advanced diagnostics, utilize the MyQ Technology integration to monitor system performance remotely; Check error codes displayed on the control panel or through the MyQ app. Perform a system reset by pressing and holding the reset button for 10 seconds. Test all safety sensors and ensure proper alignment. Use diagnostic tools provided in the troubleshooting guide to identify specific issues. If problems persist, consult the technical specifications or contact a certified technician. Regular diagnostic checks can prevent major malfunctions and ensure smooth operation of your SL3000UL gate operator. Always refer to the manual for detailed instructions. Advanced diagnostics help maintain optimal performance and reliability. Use these techniques to address complex issues effectively and safely. Ensure all tests are conducted with the gate in a safe position to avoid accidents. By following these steps, you can resolve issues promptly and keep your system running efficiently. Advanced diagnostic techniques are essential for maintaining the longevity and functionality of your SL3000UL operator. Regular checks can prevent unexpected downtime and ensure continuous operation. Use the resources provided to stay informed and maintain your system at peak performance. For further assistance, refer to the troubleshooting guide or contact customer support. Advanced diagnostics are crucial for identifying and resolving complex issues quickly and effectively. Stay proactive with your system maintenance to ensure reliability and safety. Use the tools and information available to keep your SL3000UL operating smoothly. Advanced diagnostic techniques are designed to help you troubleshoot and resolve issues efficiently. Always follow safety guidelines when performing diagnostics to avoid potential hazards. By leveraging these advanced methods, you can maintain your gate operator’s performance and extend its lifespan. Regular diagnostic checks are a key part of maintaining your SL3000UL. Use the resources provided to stay informed and ensure your system operates at its best. Advanced diagnostics are an essential part of system maintenance; Use the tools and information available to keep your SL3000UL running smoothly. Advanced diagnostic techniques help you identify and address issues before they become major problems. Stay proactive and ensure your system remains reliable and efficient. Use the advanced diagnostic features to maintain optimal performance and safety. Regular checks can prevent unexpected issues and ensure continuous operation. Advanced diagnostic techniques are a valuable resource for maintaining your SL3000UL. Use them to keep your system running smoothly and efficiently. Advanced diagnostics provide detailed insights into your system’s performance. Use this information to make informed decisions and maintain optimal functionality. Regular diagnostic checks are essential for ensuring the longevity and reliability of your SL3000UL. Use the advanced techniques provided to stay ahead of potential issues. Advanced diagnostic techniques are designed to help you maintain your system’s performance and safety. Use them regularly to ensure everything runs smoothly. Advanced diagnostics are a powerful tool for maintaining your SL3000UL. Use them to identify and resolve issues promptly, ensuring continuous operation. Advanced diagnostic techniques are crucial for maintaining the performance and safety of your SL3000UL. Use them regularly to keep your system in optimal condition. Advanced diagnostics provide the insights you need to maintain your SL3000UL effectively. Use the tools and information available to ensure smooth operation. Advanced diagnostic techniques are essential for maintaining your SL3000UL. Use them to identify and resolve issues before they escalate. Advanced diagnostics help you stay in control of your system’s performance. Use them regularly to ensure reliability and safety. Advanced diagnostic techniques are a key part of maintaining your SL3000UL. Use them to keep your system running smoothly and efficiently. Advanced diagnostics provide the detailed information you need to maintain your SL3000UL. Use them to ensure optimal performance and safety. Advanced diagnostic techniques are designed to help you maintain your system’s health. Use them regularly to prevent issues and ensure smooth operation. Advanced diagnostics are a vital tool for maintaining your SL3000UL. Use them to identify and resolve problems promptly. Advanced diagnostic techniques are essential for ensuring the longevity and reliability of your SL3000UL. Use them regularly to maintain optimal performance. Advanced diagnostics provide the insights you need to keep your SL3000UL running smoothly. Use them to address issues before they become major problems. Advanced diagnostic techniques are a key part of system maintenance. Use them to ensure your SL3000UL operates at its best. Advanced diagnostics help you maintain control over your system’s performance. Use them regularly to ensure safety and efficiency. Advanced diagnostic techniques are crucial for maintaining your SL3000UL. Use them to identify and resolve issues promptly. Advanced diagnostics provide the detailed information you need to maintain optimal performance. Use them to keep your system running smoothly. Advanced diagnostic techniques are essential for ensuring the reliability and safety of your SL3000UL. Use them regularly to maintain peak performance. Advanced diagnostics are a powerful tool for maintaining your system. Use them to identify and address issues before they escalate. Advanced diagnostic techniques are designed to help you keep your SL3000UL in top condition. Use them regularly to ensure smooth operation. Advanced diagnostics provide the insights you need to maintain your system’s health. Use them to prevent issues and ensure reliability. Advanced diagnostic techniques are a key part of maintaining your SL3000UL. Use them to keep your system running efficiently. Advanced diagnostics help you stay proactive in maintaining your system’s performance. Use them to address issues before they cause downtime. Advanced diagnostic techniques are essential for ensuring the longevity of your SL3000UL. Use them regularly to maintain optimal functionality. Advanced diagnostics provide the detailed information you need to keep your system running smoothly. Use them to resolve issues promptly. Advanced diagnostic techniques are crucial for maintaining the performance and safety of your SL3000UL. Use them regularly to ensure everything runs smoothly. Advanced diagnostics are a vital tool for system maintenance. Use them to identify and resolve issues before they become major problems. Advanced diagnostic techniques are designed to help you maintain your SL3000UL’s optimal performance. Use them regularly to ensure reliability and safety. Advanced diagnostics provide the insights you need to keep your system in top condition. Use them to address issues promptly and maintain smooth operation. Advanced diagnostic techniques are essential for maintaining the health and performance of your SL3000UL. Use them regularly to ensure everything runs efficiently. Advanced diagnostics are a powerful tool for maintaining your system. Use them to identify and resolve issues before they escalate. Advanced diagnostic techniques are crucial for ensuring the longevity and reliability of your SL3000UL. Use them regularly to maintain optimal performance. Advanced diagnostics provide the detailed information you need to keep your system running smoothly. Use them to address issues promptly and ensure continuous operation. Advanced diagnostic techniques are a key part of maintaining your SL3000UL. Use them to keep your system in optimal condition and ensure safety. Advanced diagnostics help you stay in control of your system’s performance. Use them regularly to prevent issues and maintain smooth operation. Advanced diagnostic techniques are essential for maintaining the performance and safety of your SL3000UL. Use them regularly to ensure everything runs efficiently. Advanced diagnostics are a vital tool for maintaining your system. Use them to identify and resolve issues before they become major problems. Advanced diagnostic techniques are designed to help you keep your SL3000UL in top condition. Use them regularly to ensure smooth operation and reliability. Advanced diagnostics provide the insights you need to maintain your system’s health. Use them to address issues promptly and prevent downtime. Advanced diagnostic techniques are crucial for ensuring the longevity and performance of your SL3000UL. Use them regularly to maintain optimal functionality. Advanced diagnostics are a powerful tool for system maintenance. Use them to identify and resolve issues before they escalate. Advanced diagnostic techniques are essential for maintaining the reliability and safety of your SL3000UL. Use them regularly to ensure smooth operation. Advanced diagnostics provide the detailed information you need to keep your system running smoothly. Use them to address issues promptly and maintain optimal performance. Advanced diagnostic techniques are a key part of maintaining your SL3000UL. Use them to ensure your system operates at its best and remains safe. Advanced diagnostics help you stay proactive in maintaining your system’s health. Use them to prevent issues and ensure continuous operation. Advanced diagnostic techniques are crucial for maintaining the performance and longevity of your SL3000UL. Use them regularly to ensure everything runs efficiently. Advanced diagnostics are a vital tool for maintaining your system. Use them to identify and resolve issues before they cause downtime. Advanced diagnostic techniques are designed to help you keep your SL3000UL in optimal condition. Use them regularly to maintain smooth operation and safety. Advanced diagnostics provide the insights you need to address issues promptly and ensure reliability. Advanced diagnostic techniques are essential for maintaining the performance and safety of your SL3000UL. Use them regularly to

Compatibility and Accessories

The SL3000UL is compatible with MyQ Technology and Security 2.0 accessories, enhancing functionality and security. It supports various gate configurations and integrates seamlessly with LiftMaster’s smart home solutions.

Compatible Accessories and Devices

The SL3000UL works seamlessly with MyQ-enabled devices, allowing smartphone control via the MyQ app. It also integrates with Security 2.0 accessories, offering advanced protection and convenience. Compatible devices include keypads, remote controls, and sensors. Ensure all accessories are LiftMaster-approved for optimal performance and safety. Regular software updates through the MyQ app keep your system up-to-date. Always refer to the compatibility list in this manual for verified devices. This ensures reliable operation and maintains warranty coverage.

Upgrading Firmware and Software

Regular firmware and software updates ensure optimal performance and security for your SL3000UL. Use the MyQ app to check for and install updates. Always follow on-screen instructions carefully. Disconnect any external devices before starting the update. Ensure the operator is plugged into a power source to avoid interruptions. After updating, test the system to confirm proper function. If issues arise, refer to the troubleshooting section or contact LiftMaster support. Keep your system current for the latest features and security enhancements.

Technical Specifications

The SL3000UL is a 1/2 or 1 HP AC operator, designed for gates up to 50ft and 1,000 lbs. It meets UL325 standards for safety and reliability, ensuring smooth operation in high-traffic environments. Compatible with MyQ and Security 2.0 technologies, it offers advanced features for enhanced performance and security. Refer to the manual for detailed ratings and power requirements;

Performance Metrics and Ratings

The SL3000UL is a high-performance slide gate operator, available in 1/2 HP and 1 HP options. It is designed to handle gates up to 50 feet in length and 1,000 pounds in weight, making it ideal for heavy-duty commercial applications. With a robust AC motor, it ensures smooth and reliable operation in high-traffic environments. The operator meets UL325 safety standards and is compatible with advanced technologies like MyQ and Security 2.0 for enhanced functionality and security. Its superior performance and durability make it a top choice for demanding industrial and commercial settings.

Power Requirements and Consumption

The SL3000UL operates on standard 120V AC power, requiring a dedicated 20-amp circuit for optimal performance. With energy-efficient design, it minimizes standby power consumption. The 1/2 HP model is rated for gates up to 50 feet and 1,000 lbs, while the 1 HP version handles heavier loads. Power consumption varies based on usage, but the system is engineered to deliver reliable operation while maintaining energy efficiency. Ensure proper electrical connections as outlined in the manual to avoid performance issues and prolong motor life.

Warranty and Support Information

The SL3000UL is backed by a comprehensive warranty. Visit LiftMaster.com for detailed warranty terms and to access customer support resources. Register your product for extended benefits.

Understanding Your Warranty

Your SL3000UL warranty provides coverage for parts and labor under specific conditions. The standard warranty period typically covers defects in materials and workmanship. Wearable parts may not be included. Proper installation and maintenance are required to maintain warranty validity. For detailed terms, refer to the official LiftMaster documentation. Warranty claims must be submitted through authorized dealers or customer support. Ensure your product is registered for full benefits. Visit LiftMaster.com for more information on warranty extensions and conditions.

Contacting Customer Support

For assistance with your SL3000UL, visit the official LiftMaster website to find authorized dealers or contact customer support directly. Use the “Where to Buy” tool to locate a professional installer in your area. Support is available via phone, email, or live chat for troubleshooting, warranty inquiries, or general questions. Ensure you have your product model number and serial number ready for efficient service. Additionally, LiftMaster offers online resources, including manuals and FAQs, to help address common issues promptly and effectively.

The SL3000UL manual provides comprehensive guidance for safe and effective operation. By following the instructions, you’ll maximize performance and longevity. For further assistance, visit the official LiftMaster website for resources and support.

Final Tips for Optimal Use

For optimal performance, ensure regular maintenance checks, such as lubricating moving parts and inspecting sensors. Utilize MyQ technology for remote monitoring and smart integration. Always follow safety guidelines to prevent accidents. Schedule periodic professional inspections to address potential issues early. Keep the system updated with the latest firmware for enhanced functionality. Store the manual in an accessible location for quick reference. By adhering to these tips, you’ll extend the lifespan and efficiency of your SL3000UL operator.

Additional Resources

Staying Informed About Updates

Regularly visit the LiftMaster website for firmware updates and technical bulletins to ensure your SL3000UL operates at peak performance. Subscribe to their newsletter or follow official channels for the latest information. Updates often include enhanced security features, improved functionality, and compatibility with new accessories. Keeping your system updated guarantees optimal performance and security. Additionally, refer to the manual for guidance on installing updates and accessing new features efficiently.

mbp multi-surface bonding primer instructions

The MBP Multi-Surface Bonding Primer is a single-component‚ water-based primer designed to enhance adhesion on various substrates‚ ensuring strong‚ durable bonds for multiple applications.

Overview of MBP Primer

The MBP Multi-Surface Bonding Primer is a single-component‚ water-based primer engineered to provide superior adhesion on various substrates‚ including porous and non-porous surfaces. It is ready-to-use‚ requiring no mixing‚ and offers a one-coat application for convenience. Designed to eliminate the need for shot blasting or surface abrasion‚ this primer ensures strong mechanical bonding even on challenging surfaces. With a coverage rate of up to 300 square feet per gallon‚ it is ideal for large-scale projects. Compatible with a wide range of materials‚ including tile‚ concrete‚ and existing flooring‚ MBP primer is a versatile solution for flooring preparation. It is part of Custom Building Products’ high-performance flooring system‚ ensuring reliability and durability for both residential and commercial applications.

Key Features and Benefits

The MBP Multi-Surface Bonding Primer offers exceptional versatility and performance. It is a single-component‚ water-based primer that requires no mixing‚ making it easy to use. Designed for one-coat application‚ it ensures rapid surface preparation and minimizes downtime. The primer excels on both porous and non-porous substrates‚ eliminating the need for shot blasting or surface abrasion. Its unique formulation‚ combining aggregates and polymers‚ promotes superior mechanical adhesion‚ even on challenging surfaces. Compatible with a wide range of materials‚ including tile‚ concrete‚ and existing flooring‚ MBP primer is ideal for diverse applications. It is also backed by a lifetime warranty‚ ensuring long-lasting durability and reliability in high-performance flooring systems. These features make it a preferred choice for professionals and DIY projects alike.

Surface Preparation Guidelines

Ensure surfaces are clean‚ dry‚ and free of contaminants. Ambient temperature‚ surfaces‚ and materials should be between 50°F (10°C) and 95°F (35°C) for optimal results.

General Surface Prep Requirements

Proper surface preparation is essential for optimal bonding. Surfaces must be clean‚ dry‚ and free of dust‚ oil‚ grease‚ or other contaminants. Any loose or unstable material should be removed to ensure a solid base. For painted surfaces‚ the paint must be well-bonded to the substrate. Ambient temperature‚ surfaces‚ and materials should be maintained between 50°F (10°C) and 95°F (35°C) for at least 72 hours before and after application. Use chemical-resistant gloves‚ such as nitrile‚ when handling the product. Failure to meet these requirements may result in poor adhesion or compromised performance. Always follow manufacturer guidelines for specific substrate types to ensure a strong‚ durable bond.

Cleaning the Surface Before Application

Thoroughly clean the surface to ensure optimal primer adhesion. Remove all dirt‚ dust‚ grease‚ and contaminants using a suitable cleaning solution or detergent. For porous surfaces‚ vacuum thoroughly to eliminate loose particles. For non-porous surfaces‚ use a degreaser or solvent-based cleaner to remove oils and waxes. Rinse the surface with clean water and allow it to dry completely before applying the primer. Old adhesive residues or wax should be mechanically scrubbed or treated with a solvent-based cleaner. Wearing chemical-resistant gloves‚ such as nitrile‚ is recommended when handling cleaning agents. Ensure the surface is free of standing water and moisture before proceeding. Proper cleaning ensures a strong bond and prevents adhesion failure. Always follow manufacturer guidelines for specific substrate cleaning requirements.

Handling Special Substrates

When working with unique or challenging surfaces‚ such as glass‚ metal‚ or existing tiles‚ ensure proper preparation for optimal bonding. For non-porous substrates like glass or metal‚ lightly abrade the surface using a mild abrasive to enhance adhesion. For old tiles‚ clean thoroughly to remove grout residue or sealers. If the substrate is painted‚ ensure the paint is well-bonded and free of flaking. For surfaces with existing adhesives‚ scrape off loose material and clean with a solvent-based cleaner. Allow the substrate to dry completely before applying the primer. Special substrates may require additional steps to ensure compatibility and adhesion. Always refer to the manufacturer’s guidelines for specific substrate recommendations to achieve the best results with MBP Multi-Surface Bonding Primer.

Application Instructions

Apply MBP primer using a brush or roller on clean‚ prepared surfaces. Suitable for both porous and non-porous substrates‚ it ensures excellent adhesion and dries within 4-6 hours.

Mixing the Primer

The MBP Multi-Surface Bonding Primer is a single-component‚ water-based product that is ready to use and does not require mixing with additional components. However‚ it is recommended to stir the primer thoroughly before application to ensure uniform consistency. Use a drill with a paddle mixer attachment to mix the primer‚ starting at a low speed to prevent splashing. Continue mixing until the primer reaches a smooth‚ even texture. Avoid over-mixing‚ as this can introduce air bubbles. Always wear chemical-resistant gloves‚ such as nitrile‚ when handling the primer. Mixing should be done in a well-ventilated area‚ and the primer should be applied immediately after mixing to ensure optimal adhesion and performance. Follow all safety precautions and instructions for best results.

Applying the Primer

The MBP Multi-Surface Bonding Primer should be applied using a brush‚ roller‚ or spray equipment‚ depending on the surface size and texture. Ensure the surface is clean‚ dry‚ and free of contaminants before application. Use smooth‚ even strokes to cover the entire area‚ working in small sections to maintain even coverage. The primer is ready-to-use and does not require thinning. Apply a single coat‚ as multiple coats are not necessary for most applications. The primer is suitable for both porous and non-porous surfaces‚ including tile‚ concrete‚ and vinyl. Allow the primer to dry completely‚ typically within 4-6 hours‚ before proceeding with the next steps in your project. Always follow the recommended coverage rate of 300 square feet per gallon for optimal results. Ensure the ambient temperature is between 50°F (10°C) and 95°F (35°C) during application and drying. Proper surface preparation is essential for achieving strong adhesion and long-term durability.

Drying Time and Conditions

The MBP Multi-Surface Bonding Primer typically dries within 4-6 hours under normal conditions. Optimal drying occurs at temperatures between 50°F (10°C) and 95°F (35°C). Ensure the surface is clean‚ dry‚ and free of dust or moisture before application. The primer does not require thinning and should be applied in one coat. Allow the primer to dry completely before proceeding with tile installation‚ mortar application‚ or other subsequent steps. High humidity may extend drying time‚ so monitor conditions to ensure proper curing. The primer is suitable for use on both porous and non-porous surfaces‚ including concrete‚ tile‚ and vinyl. Always follow the manufacturer’s instructions and recommended coverage rate of 300 square feet per gallon for best results. Proper drying ensures strong adhesion and long-term durability of the bonding surface.

Compatibility and Usage

MBP Multi-Surface Bonding Primer is compatible with various substrates‚ including tile‚ concrete‚ and vinyl‚ and is ideal for flooring‚ walls‚ and countertops‚ ensuring strong‚ lasting bonds.

Compatible Substrates

MBP Multi-Surface Bonding Primer is compatible with a wide range of substrates‚ including porous and non-porous surfaces such as concrete‚ tile‚ vinyl‚ and more. It works exceptionally well on difficult-to-bond substrates without requiring shot blasting or abrasion‚ making it ideal for various flooring and wall applications. The primer is specifically designed to ensure strong adhesion on surfaces like ceramic tile‚ natural stone‚ and even existing vinyl flooring‚ making it a versatile solution for both residential and commercial projects. Its compatibility with multiple substrates ensures a reliable bond‚ promoting successful tile installations and other flooring systems. This versatility makes MBP a go-to choice for professionals and DIYers alike.

Recommended Applications

MBP Multi-Surface Bonding Primer is ideal for various flooring and wall installations‚ particularly where challenging substrates are present. It is highly recommended for tile-over-tile projects‚ such as shower installations‚ and works effectively on substrates like vinyl‚ concrete‚ and existing tile surfaces. The primer is also suitable for use in both residential and commercial settings‚ ensuring strong adhesion for tile‚ natural stone‚ and other flooring materials. Its versatility makes it a preferred choice for professionals and homeowners alike‚ especially in areas where proper bonding is difficult to achieve. MBP is also compatible with CUSTOM’s line of mortars and self-leveling underlayments‚ making it a key component in high-performance flooring systems.

Compatible Adhesives and Mortars

MBP Multi-Surface Bonding Primer is specifically designed to work seamlessly with CUSTOM’s professional-grade mortars and self-leveling underlayments. It is fully compatible with a wide range of adhesives‚ including thin-set mortars‚ epoxy-based adhesives‚ and other flooring compounds. This primer ensures a strong‚ durable bond between the substrate and the adhesive or mortar‚ reducing the risk of delamination. Its compatibility with high-performance flooring systems makes it an essential component for both residential and commercial installations. By using MBP with CUSTOM’s recommended products‚ users can achieve superior results and benefit from a lifetime warranty on their flooring projects.

Safety Precautions

Wear chemical-resistant gloves and ensure good ventilation. Avoid skin and eye contact. In case of exposure‚ wash thoroughly with water. Follow all safety instructions carefully.

Protective Gear Recommendations

Wearing appropriate protective gear is essential when working with MBP Multi-Surface Bonding Primer. Use chemical-resistant gloves‚ such as nitrile‚ to prevent skin irritation. Safety goggles or glasses are recommended to protect eyes from splashes. A dust mask or respirator is advised to avoid inhaling vapors or particles. Ensure good ventilation in the workspace to minimize exposure to fumes. Avoid wearing loose clothing that could come into contact with the primer. Wash hands thoroughly after handling the product. Follow all safety guidelines provided by the manufacturer to ensure a safe and effective application process.

Hazardous Material Handling

Handle MBP Multi-Surface Bonding Primer with care‚ as it is classified as a hazardous material. Wear chemical-resistant gloves‚ such as nitrile‚ and safety goggles to prevent exposure. Ensure proper ventilation in the workspace to avoid inhaling vapors. Store the primer in its original container with a tightly sealed lid‚ away from heat sources and open flames. Dispose of unused product and materials in accordance with local‚ state‚ and federal regulations. In case of spills‚ neutralize the area with an appropriate agent and contain the spill to prevent environmental contamination. Do not pour the primer down drains or sewers. Use absorbent materials to clean up spills and dispose of them properly. Keep out of reach of children and pets. Follow all safety guidelines for transportation and storage. Consult local authorities for specific disposal requirements if unsure.

Drying and Curing

The MBP primer typically dries within 4-6 hours under optimal conditions of 50°F to 95°F (10°C to 35°C) and 40%-60% humidity‚ curing fully in 24-48 hours.

Optimal Temperature and Humidity Conditions

The MBP Multi-Surface Bonding Primer requires ambient temperatures between 50°F (10°C) and 95°F (35°C) for proper drying and curing. Ideal humidity levels range from 40% to 60%; These conditions ensure the primer adheres effectively and cures uniformly. Maintaining consistent temperature and humidity levels is crucial during application and for at least 72 hours after to achieve optimal results. Avoid applying the primer in extreme or fluctuating environmental conditions‚ as this may compromise adhesion and durability. Proper environmental control is essential for maximizing the performance of the MBP primer on various substrates.

Curing Time Before Next Steps

The MBP Multi-Surface Bonding Primer typically dries to the touch within 4-6 hours under normal conditions. However‚ it is recommended to allow the primer to cure for at least 24 hours before proceeding with further applications or installations. This ensures proper adhesion and bonding strength. Curing time may vary depending on ambient temperature‚ humidity‚ and substrate conditions. Cooler temperatures or higher humidity can extend the curing period. It is essential to wait until the primer is fully cured and free of tackiness before applying adhesives‚ mortars‚ or other materials. Rushing this step may compromise the bond’s integrity and long-term performance.

Troubleshooting Common Issues

Poor adhesion or uneven coverage may occur due to improper surface preparation or environmental factors; Re-clean the surface and reapply primer for optimal results.

Addressing Poor Adhesion

Poor adhesion with MBP Multi-Surface Bonding Primer is often caused by inadequate surface preparation. Ensure the surface is clean‚ dry‚ and free of contaminants like dust or old adhesives. If adhesion issues persist‚ check that the substrate is within the recommended temperature and humidity range. Old or poorly bonded surfaces may require additional preparation‚ such as light scraping or sanding‚ to create a stable base. Reapply the primer according to instructions and allow proper drying time before proceeding. For particularly challenging surfaces‚ a second coat or a compatible adhesive may be necessary to achieve optimal results. Always refer to the product’s technical data sheet for specific guidance.

Fixing Uneven Coverage

If uneven coverage occurs when using MBP Multi-Surface Bonding Primer‚ it may be due to improper application or surface preparation. Allow the primer to dry completely‚ then lightly sand the uneven areas to create a smooth base. Reapply the primer with a high-quality roller or brush‚ working in small sections to ensure even distribution. Avoid over-application‚ as this can lead to thick‚ uneven layers. If the surface was not adequately cleaned or dried before application‚ poor coverage may result. Always ensure the substrate is free of contaminants and moisture before reapplying. For best results‚ follow the manufacturer’s instructions for application thickness and drying times to achieve a uniform finish.

Warranty and Manufacturer Support

The MBP Multi-Surface Bonding Primer is backed by a lifetime warranty‚ ensuring durability and performance. Custom Building Products offers dedicated customer support for product inquiries and assistance.

Product Warranty Details

The MBP Multi-Surface Bonding Primer is covered by a limited lifetime warranty‚ ensuring long-term performance and reliability. This warranty guarantees the product will meet its specified quality and adhesion standards when used as directed. Coverage extends to manufacturing defects and failure to perform as advertised. Warranty claims must be submitted with proof of purchase and details of product use. Custom Building Products stands behind the durability and effectiveness of MBP‚ offering support for any issues arising from proper application. Conditions include adherence to instructions and use on approved substrates. For warranty service‚ contact Custom Building Products’ customer support team directly.

Contacting Customer Service

For questions or assistance with the MBP Multi-Surface Bonding Primer‚ contact Custom Building Products’ customer service team at 800-272-8786. Their office is located at 13001 Seal Beach Blvd‚ Seal Beach‚ CA 90740-2757. Representatives are available to provide technical support‚ troubleshooting‚ and warranty inquiries. Customers can also reach out for guidance on product usage‚ compatibility‚ and application best practices. For more detailed information or to submit a query‚ visit their website or refer to the product’s technical data sheet. Ensure to have product details and purchase information ready when contacting support for efficient assistance.

The MBP Multi-Surface Bonding Primer is a versatile‚ efficient solution for ensuring strong adhesion on diverse substrates‚ making it ideal for various projects while maintaining ease of application.

The MBP Multi-Surface Bonding Primer is a single-component‚ water-based primer designed to enhance adhesion on various substrates‚ including porous and non-porous surfaces. It offers a one-coat‚ ready-to-use application‚ eliminating the need for shot blasting or abrasion. The primer is compatible with multiple substrates and works exceptionally well where proper bonding is challenging. Its unique formulation‚ featuring aggregates and polymers‚ promotes strong mechanical adhesion. Proper surface preparation is essential for optimal results‚ and the product is part of a high-performance system eligible for a lifetime warranty. It is ideal for projects requiring reliable and durable bonding solutions‚ making it a versatile choice for professionals and DIYers alike.

Final Recommendations

For optimal results‚ ensure proper surface preparation by cleaning and drying substrates thoroughly. Always wear chemical-resistant gloves and maintain ambient temperatures between 50°F and 95°F during application and curing. Apply the primer in smooth‚ even strokes using a brush or roller‚ and allow it to dry completely before proceeding with adhesives or mortars. For challenging substrates‚ follow specific handling guidelines to ensure strong adhesion. Regularly consult the technical data sheet for detailed instructions and compatibility information. For complex projects or uncertain conditions‚ contact Custom Building Products’ customer support for tailored guidance. This ensures a successful‚ long-lasting bonding solution for your project.

rocky horror audience participation script pdf

The Rocky Horror Picture Show is a cult classic film celebrated for its unique blend of music, humor, and audience interaction. The audience participation script enhances the viewing experience by encouraging fans to engage with the film through call-backs, props, and rituals, fostering a sense of community among participants. This interactive tradition has become a hallmark of the film’s enduring popularity, transforming screenings into immersive events. The script, widely available as a PDF, provides detailed instructions for newcomers and seasoned fans alike, ensuring the legacy of this iconic film continues to thrive.

Overview of the Rocky Horror Picture Show

The Rocky Horror Picture Show is a 1975 musical comedy horror film that has become a cult classic, celebrated for its unique blend of campy humor, catchy music, and outrageous characters. The story follows Brad and Janet, a naive young couple who seek shelter in a mysterious castle after their car breaks down, only to discover a world of eccentric and fantastical beings. The film’s irreverent style and subversive themes have made it a favorite among audiences, particularly for its late-night screenings where fans actively participate through call-and-response lines, prop usage, and choreographed rituals. This interactive tradition, guided by the audience participation script, has cemented the film’s legacy as a cultural phenomenon, fostering a sense of community and shared creativity among its devotees.

First, I’ll recall what I know about Rocky Horror. It’s a cult classic with a strong tradition of audience participation. Fans go to screenings and interact with the movie in specific ways—shouting call-backs, using props, and following certain rituals. This participation isn’t just random; it’s organized, often guided by a script that tells people exactly when to say what and which props to use.

Looking at the previous interactions, the user provided some web content mentioning the script being available as a PDF, including lines to say along with the movie, call-backs, and responses between the audience and the screen. There were also mentions of specific lines for when certain characters appear, like “Asshole!” for Brad and “Slut!” for Janet before she becomes one.

So, for the subheading ‘

The Concept of Audience Participation in Rocky Horror

‘, I need to explain what audience participation entails, how it works, and maybe touch on the community aspect. I should avoid delving into the history or how to prepare, as those are covered elsewhere.

I’ll start by introducing audience participation as a defining feature of Rocky Horror. Then, explain that it involves call-backs and prop usage. Mention that these interactions are synchronized with the film and are detailed in the script. Also, highlight that this participation enhances the viewing experience and fosters a sense of community. Maybe add that it’s a unique way to engage with the film and makes each screening a shared event.
Let me draft a response:

The concept of audience participation in Rocky Horror is a defining feature of its cult following. Fans engage with the film through synchronized call-backs and prop rituals, creating a dynamic interaction between the audience and the screen. These traditions are meticulously detailed in the Rocky Horror audience participation script PDF, guiding participants through precise lines and actions. This collective engagement enhances the viewing experience, turning screenings into lively, communal events. The participation script ensures that everyone, from newcomers to seasoned veterans, can join in, fostering a sense of unity and shared creativity. It’s a unique way to celebrate the film’s legacy and make each screening a memorable, interactive experience.

Now, check the word count. Let me count:

The
concept
of
audience
participation
in
Rocky
Horror
is
a
defining
feature
of
its
cult
following.
Fans
engage
with
the
film
through
synchronized
call-backs
and
prop
rituals,
creating
a
dynamic
interaction
between
the
audience
and
the
screen.
These
traditions
are
meticulously
detailed
in
the
Rocky
Horror
audience
participation
script
PDF,
guiding
participants
through
precise
lines
and
actions.
This
collective
engagement
enhances
the
viewing
experience,
turning
screenings
into
lively,
communal
events.
The
participation
script
ensures
that
everyone,
from
newcomers
to
seasoned
veterans,
can
join
in,
fostering
a
sense
of
unity
and
shared
creativity.
It’s
a
unique
way
to
celebrate
the
100. film’s
101. legacy
102. and
103. make
104. each
105. screening
106; a
107. memorable,
108. interactive
109. experience.

That’s . I need to add a few more to reach 113. Maybe add an adjective or expand a bit without overlapping with other sections.

Let me revise:

The concept of audience participation in Rocky Horror is a defining feature of its cult following. Fans engage with the film through synchronized call-backs and prop rituals, creating a dynamic interaction between the audience and the screen. These traditions are meticulously detailed in the Rocky Horror audience participation script PDF, guiding participants through precise lines and actions. This collective engagement enhances the viewing experience, turning screenings into lively, communal events. The participation script ensures that everyone, from newcomers to seasoned veterans, can join in, fostering a sense of unity and shared creativity. It’s a unique way to celebrate the film’s legacy and make each screening a memorable, interactive experience.

Now, it’s . Let me add a sentence or two to reach 113 without overlapping:

Additionally, this interactive approach allows fans to become active contributors to the story, blurring the line between spectator and performer. The script serves as a roadmap, ensuring that the traditions remain consistent and vibrant across different screenings and communities.

Now, let’s count:
Additionally,
this
interactive
approach
allows
fans
to
become
active
contributors
to
the
story,
blurring
the
line
between
spectator
and
performer.
The
script
serves
as
a
roadmap,
ensuring
that
the
traditions
remain
consistent
and
vibrant
across
different
screenings
and
communities.
This adds , making the total 148, which is over. So, I need to be careful. Instead, I can add a concise sentence within the existing structure;

Perhaps adjust the last sentence:

It’s a unique way to celebrate the film’s legacy and make each screening a memorable, interactive experience, ensuring the tradition stays vibrant across generations.

Now, let’s count:

The
concept
of
audience
participation
in
Rocky
Horror
is
a
defining
feature
of
its
cult
following.
Fans
engage
with
the
film
through
synchronized
call-backs
and
prop
rituals,
creating
a
dynamic
interaction
between
the
audience
and
the
screen.
These
traditions
are
meticulously
detailed
in
the
Rocky
Horror
audience
participation
script
PDF,
guiding
participants
through
precise
lines
and
actions.
This
collective
engagement
enhances
the
viewing
experience,
turning
screenings
into
lively,
communal
events.
The
participation
script
ensures

that
everyone,
from
newcomers
to
seasoned
veterans,
can
join
in,
fostering
a
sense
of
unity
and
shared
creativity.
It’s
a
unique
way
to
celebrate
the
100. film’s
101. legacy
102. and
103. make
104. each
105. screening
106. a
107. memorable,
108. interactive
109. experience,
110. ensuring
111. the
112. tradition
113. stays
114. vibrant
115. across
116. generations.

Oops, that’s . I need to trim it down. Perhaps remove the last part:

It’s a unique way to celebrate the film’s legacy and make each screening a memorable, interactive experience.

That brings it back to . Maybe add ‘vibrant’ before ‘experience’:

It’s a unique way to celebrate the film’s legacy and make

History of the Rocky Horror Audience Participation Script

The Rocky Horror audience participation script began in the 1970s, emerging from early fan interactions. Pioneers like Steve Thomas and John Dietsche developed call-backs and rituals, shaping the script into a cult staple.

Origins of the Audience Participation Tradition

The Rocky Horror audience participation tradition began in the 1970s, emerging organically from fan interactions during midnight screenings; Early participants spontaneously shouted lines and jokes, creating a communal experience. Over time, these call-backs and rituals were formalized into a script, with pioneers like Steve Thomas and John Dietsche contributing key elements. The script evolved to include prop lists, audience etiquette, and synchronized responses, enhancing the interactive nature of the film. This tradition has since become a defining feature of Rocky Horror screenings, fostering a sense of belonging among fans. The script’s widespread availability, including as a PDF, has ensured its enduring popularity and accessibility for new generations of participants.

Key Contributors to the Script’s Development

The Rocky Horror audience participation script owes its development to several dedicated fans and creators. Steve Thomas and John Dietsche were instrumental in organizing early call-backs and rituals, laying the groundwork for the script. Sal Piro, a prominent figure in the Rocky Horror fan community, played a crucial role in standardizing the participation traditions. Their efforts were complemented by contributions from Richard O’Brien, the film’s writer, who supported the interactive aspect of the screenings. These key contributors transformed spontaneous audience reactions into a structured script, ensuring the tradition’s longevity. Their work is now widely available, including as a PDF, allowing fans worldwide to engage with the film in a unified and immersive way.

Key Elements of the Rocky Horror Audience Participation Script

The script includes call-backs, audience responses, and prop lists to enhance interaction. Instructions are provided in square brackets, guiding participants. Specific lines like “Asshole!” for Brad and “Slut!” for Janet are highlighted, along with rules for participation, ensuring a cohesive and immersive experience for all.

Call-Backs and Audience Responses

Call-backs and audience responses are central to the Rocky Horror experience, with specific lines shouted during key scenes. For example, when Brad appears, audiences yell “Asshole!” and “Slut!” when Janet is introduced. These responses, timed to align with the film, create a collective, interactive atmosphere. The script PDF details these traditions, ensuring participants know when and what to say. Additionally, props like water pistols and toilet paper enhance the sensory experience, while choreographed dances like the “Time Warp” encourage everyone to join in. This synchronized interaction transforms the film into a shared, immersive event, fostering a sense of community and playful rebellion. The call-backs and responses are a cornerstone of Rocky Horror’s enduring appeal, making it more than just a movie but a participatory ritual.

Prop List and Their Usage

The prop list is a crucial element of the Rocky Horror audience participation script, enhancing the interactive experience. Essential items include rice, water pistols, and toilet paper. Rice is thrown during Brad and Janet’s wedding scene, symbolizing the chaos that ensues. Water pistols are used to mimic the rain as Brad and Janet approach the castle. Toilet paper is tossed when Dr. Scott enters, adding a humorous touch. The script PDF provides detailed instructions, ensuring participants know exactly when and how to use each prop. These items transform viewers into active participants, fostering a communal and immersive experience. The synchronized use of props is a beloved tradition, showcasing the creativity and engagement of Rocky Horror fans worldwide;

Audience Etiquette and Participation Rules

Respect and enthusiasm are key to the Rocky Horror experience. Audience members are encouraged to participate actively but politely, ensuring everyone enjoys the show. Call-backs and responses should be loud and clear, but not disruptive. Props like rice, water pistols, and toilet paper are used at specific moments, guided by the script PDF. However, items like confetti or excessive water are often banned to protect the venue. Respect fellow participants and theater staff, avoiding behavior that could damage property or disturb others. First-timers, or “virgins,” are warmly welcomed and often initiated with lighthearted rituals. Following these guidelines ensures a fun, immersive experience for all, maintaining the legacy of this iconic interactive tradition.

Cultural Significance of the Participation Script

The Rocky Horror audience participation script has fostered a vibrant community, becoming a cultural icon and ensuring the film’s enduring legacy through interactive traditions.

Impact on the Rocky Horror Fan Community

The Rocky Horror audience participation script has profoundly shaped the fan community, fostering a shared identity and sense of belonging. By providing a structured yet creative way to engage with the film, the script has united fans worldwide, creating a bond through call-backs, props, and rituals. It has also inspired countless fan creations, from costumes to art, further enriching the community. The script’s availability as a PDF has made it accessible to new generations, ensuring the film’s legacy endures. This collective participation has transformed the film into a cultural phenomenon, cementing its place as a cornerstone of cult cinema and fan culture.

How the Script Enhances the Viewing Experience

The Rocky Horror audience participation script elevates the viewing experience by transforming passive watching into an interactive event. It provides synchronized lines, call-backs, and prop instructions, allowing the audience to engage with the film in real-time. This collective interaction creates a dynamic, immersive atmosphere, enhancing emotional connection and enjoyment. The script also adds layers of humor and creativity, encouraging fans to express themselves freely. Available as a PDF, the script ensures everyone can participate, making each screening unique and memorable. This shared experience fosters a sense of community, turning the film into a celebration of creativity and collaboration that transcends traditional cinema.

How to Prepare for a Rocky Horror Show

To prepare for a Rocky Horror Show, download the audience participation script PDF for lines, call-backs, and prop instructions. Familiarize yourself with the script format, which includes cues and audience responses. Gather essential props like water guns, toast, and newspapers based on the prop list provided. Understand the script’s instructions for timing and audience etiquette to ensure a respectful and enjoyable experience. Reading through the script beforehand will help you follow along confidently during the show, enhancing your interactive experience.

Downloading the Rocky Horror Audience Participation Script PDF

Downloading the Rocky Horror audience participation script PDF is straightforward. Visit official websites like www.rockyhorror.org or community-shared resources such as TimeWarp UK. These sources offer free PDF downloads of the script, which includes call-backs, prop lists, and audience etiquette. Ensure you select a reliable source to avoid incomplete or unofficial versions. Once downloaded, review the script to familiarize yourself with the format, which often includes cues, audience lines, and stage directions. For first-time participants, reading the script beforehand is highly recommended to understand the timing and flow of the interactive elements. This preparation enhances your ability to fully engage with the show and enjoy the immersive experience.

Understanding the Script Format and Instructions

Understanding the script format is essential for a seamless Rocky Horror experience. The PDF typically features dialogue from the film, with audience call-backs in bold or highlighted sections. Lines in ALL CAPS indicate songs or key moments for audience participation. Stage directions are provided to guide timing and actions. Props like rice, water, and toilet paper are listed with specific scenes for use. Etiquette guidelines, such as respecting venue rules and avoiding disruptions, are also included. Familiarizing yourself with these elements ensures you’re prepared to engage fully. The script’s structure is designed to be user-friendly, making it easy for both newcomers and veteran fans to follow and participate in the interactive fun. This format enhances the communal aspect of the show, creating a unique and memorable experience.

Tips for First-Time Participants

Welcome to the Rocky Horror experience! Familiarize yourself with the script beforehand to know call-backs and prop cues. Bring necessary props like rice, water, and toilet paper. Engage freely, but respect fellow participants and venue rules. Don’t worry about mistakes—enthusiasm matters more! The script guides you through interactions, so follow its instructions. Enjoy the immersive fun and let the community spirit embrace you. It’s a judgment-free zone, so dive in and make unforgettable memories with fellow fans!

Virgins Guide to Rocky Horror Participation

Welcome to your first Rocky Horror experience! This guide ensures you’re prepared to join the fun. Download the Rocky Horror audience participation script PDF to understand call-backs, props, and audience etiquette. Bring essential items like rice, water, toilet paper, and a newspaper. Familiarize yourself with key lines to shout, such as “Asshole!” for Brad and “Slut!” for Janet. Don’t worry about mistakes—enthusiasm is key. Follow instructions in the script, and let the community’s energy guide you. Respect fellow participants and the venue. Remember, Rocky Horror is a judgment-free zone where everyone is encouraged to embrace their creativity and have fun. Dive in and enjoy the unforgettable experience!

Common Mistakes to Avoid During the Show

First-time participants often make mistakes that can disrupt the experience. One common error is not using the Rocky Horror audience participation script PDF, leading to missed call-backs and prop cues. Avoid shouting over others or speaking out of turn, as this can distract the group. Never bring prohibited props like real water or fire, as they pose safety risks. Refrain from touching or throwing items at the screen or stage. Overly loud or inappropriate behavior can ruin the atmosphere. Lastly, don’t overcomplicate your participation—relax and enjoy the interactive nature of the show. By following these tips, you’ll contribute to a fun and memorable experience for everyone.

Where to Find the Rocky Horror Audience Participation Script

The Rocky Horror audience participation script PDF can be downloaded from official websites like www.rockyhorror.org or community-shared resources like TimeWarp UK. It’s also widely shared online for free.

Official Websites and Reliable Sources

Official websites like www.rockyhorror.org and TimeWarp UK are trusted sources for downloading the Rocky Horror audience participation script PDF. These platforms provide authentic scripts, prop lists, and guides for fans. They have been reliable since the 1990s, ensuring the script remains accessible. Always verify sources to avoid unauthorized versions. Official sites guarantee quality and accuracy, making them the best choice for newcomers and long-time fans. They also offer additional resources like virgin guides and FAQs to enhance participation. These websites are endorsed by the Rocky Horror fan community, ensuring a safe and enjoyable experience. Visit them to download the script and join the interactive fun responsibly.

Community-Shared Scripts and Resources

Beyond official sources, the Rocky Horror fan community shares scripts and resources through forums, social media, and fan websites. These community-driven scripts are often freely available and include personal touches from longtime participants. Fans collaborate to update scripts with modern references, ensuring the tradition stays fresh. Many community scripts are shared as PDFs, making them easy to download and print. These resources also include tips for first-timers and creative prop ideas, fostering a sense of unity among fans. While official scripts are recommended for accuracy, community-shared versions showcase the dedication and creativity of the Rocky Horror fan base, offering a unique perspective on the participation experience.

The Role of the Script in Modern Performances

The Rocky Horror audience participation script remains a vibrant part of modern performances, adapting to new audiences while preserving its interactive essence and cultural significance, ensuring continued engagement and enjoyment. PDF versions are widely used to maintain consistency across shows, keeping the tradition alive and thriving in contemporary settings.

Adapting the Script for Different Audiences

The Rocky Horror audience participation script has been cleverly adapted to cater to diverse audiences, ensuring its universal appeal. Regional dialects, cultural references, and modern humor are often incorporated to make the experience relatable and fresh. While the core traditions remain intact, subtle modifications allow the script to resonate with new generations and varied demographics. This adaptability ensures that the interactive elements, such as call-backs and prop usage, remain engaging while maintaining the film’s iconic essence. By balancing consistency with creativity, the script continues to thrive, making it accessible and enjoyable for a wide range of participants. This flexibility has been key to sustaining its popularity and fostering a vibrant, inclusive fan community.

The Script’s Enduring Popularity

The Rocky Horror audience participation script remains a timeless phenomenon, captivating audiences for decades. Its enduring popularity stems from its ability to evolve while preserving the film’s iconic essence. The script’s interactive nature fosters a sense of community, as fans worldwide unite through shared rituals and call-backs. Its adaptability to modern audiences, with updated references and humor, ensures its relevance. The availability of the script in PDF format has made it easily accessible, allowing new generations to join the tradition. This unique blend of nostalgia and innovation keeps the script a beloved cornerstone of Rocky Horror culture, ensuring its continued celebration and enjoyment.

The Rocky Horror audience participation script is a cultural phenomenon, fostering community and interactivity. Its enduring appeal lies in its ability to unite fans worldwide, ensuring the film’s legacy thrives.

Final Thoughts on the Rocky Horror Audience Participation Script

The Rocky Horror audience participation script is a cornerstone of the film’s enduring legacy, offering fans a unique way to engage with the story. By providing call-backs, prop instructions, and community guidelines, it ensures that every screening is an interactive and memorable experience. The script’s availability as a PDF has made it accessible to new generations, preserving the tradition of audience involvement. Its impact on fan culture is undeniable, creating a shared language and rituals that unite participants worldwide. This script is not just a guide but a testament to the power of community and creativity in redefining how we experience cinema.

Encouragement to Join the Rocky Horror Community

Joining the Rocky Horror community is an invitation to embrace a culture of creativity, inclusivity, and shared excitement. Whether you’re a “virgin” or a seasoned participant, the audience participation script offers a gateway to a vibrant and welcoming group. Downloading the PDF is just the first step; attending a show and engaging with fellow fans is where the magic truly happens. The community thrives on camaraderie, with seasoned participants often mentoring newcomers. Don’t hesitate to dive in—throw on some fishnets, grab your props, and let the infectious energy of the Rocky Horror community sweep you off your feet. Together, we celebrate a film that has become so much more than a movie.

pdf blank drivers license template

PDF blank driver’s license templates offer a versatile and convenient way to create customizable identification documents for various purposes, from creative projects to official needs, ensuring ease and precision.

1.1 What is a Blank Driver’s License Template?

A blank driver’s license template is a customizable digital document designed to mimic the appearance of a real ID. It provides editable fields for personal details, such as name, address, and license number, allowing users to input specific information. These templates are often in PDF format, making them easy to modify and print. They are commonly used for creative projects, educational activities, or organizational events, offering a versatile tool for various identification needs without the complexity of official documents.

1.2 Importance of Using PDF Format for Driver’s License Templates

The PDF format is widely preferred for driver’s license templates due to its universal compatibility and professional presentation. PDFs maintain consistent layouts and high-quality visuals across devices, ensuring a polished appearance. They are easily editable, allowing users to customize details while preserving security features. This format is also scalable, making it suitable for both digital and physical use. Its reliability and versatility make PDF the ideal choice for creating authentic-looking identification documents for various purposes, from creative projects to official needs.

Uses of Blank Driver’s License Templates

Blank driver’s license templates are ideal for creative projects, educational activities, and custom identification needs, offering flexibility for personalization and professional-looking results in various applications.

2.1 Creative Projects and Design

Blank driver’s license templates are a fantastic tool for creative projects, allowing users to craft personalized IDs for dramatic play, school activities, or artistic designs. They offer flexibility for customization, enabling individuals to add unique details, logos, or imagery. These templates are also ideal for themed events, movie props, or novelty items, providing a professional finish. With editable fields, users can experiment with different designs, making them a versatile resource for both fun and functional applications. Their ease of use fosters creativity, making them a popular choice for crafty projects and educational purposes.

2.2 Dramatic Play and Educational Activities for Children

Blank driver’s license templates are a great tool for engaging children in dramatic play and educational activities. They encourage role-playing, helping kids explore different scenarios like pretending to drive or travel. These templates can be customized with fun designs, making them ideal for classroom projects or homeschooling. They also teach children about identification documents in a playful way. By incorporating these templates into activities, educators can promote creativity and learning, while keeping children entertained and focused during interactive sessions.

2.3 Custom Identification for Events or Organizations

Blank driver’s license templates are ideal for creating custom ID cards for events, parties, or organizations. They allow you to design unique identification with logos, colors, and specific details, ensuring a professional finish. These templates are versatile and can be tailored to fit various themes, making them perfect for conferences, festivals, or membership cards. By using editable PDFs, organizations can quickly produce personalized IDs without the need for advanced design skills, saving time and resources while maintaining a professional appearance.

Features of a Printable Blank Driver’s License Template

Printable blank driver’s license templates offer editable fields, customizable designs, and HD quality, ensuring a professional finish. They provide ease of use and flexibility for personal or organizational needs.

3;1 Editable Fields for Personal Information

Blank driver’s license templates in PDF format typically include editable fields for personal information such as name, address, license number, and date of birth. These fields allow users to input specific details easily, making the template versatile for various purposes. The editable nature ensures that the template can be customized to match individual or organizational requirements. Additionally, the ability to modify personal information ensures accuracy and relevance for different applications, whether for creative projects or official documentation.

3.2 Customizable Design Elements

Blank driver’s license templates often feature customizable design elements, allowing users to tailor the appearance to suit specific needs. These elements may include logos, icons, and color schemes, enabling personalization for creative projects or organizational branding. The ability to modify fonts, layouts, and visual accents ensures the template can be adapted for various purposes, from novelty designs to professional identification. This flexibility makes the templates versatile for both fun and formal applications, enhancing their utility across different contexts.

3.4 HD Quality and Professional Layout

Blank driver’s license templates in PDF format typically feature high-definition quality, ensuring crisp and clear visuals. The professional layout mimics real identification documents, with structured fields and realistic details. This makes them suitable for both creative projects and official purposes. The HD quality ensures that printed versions appear authentic and professional, while the layout provides a seamless experience for customization. These templates are designed to meet the standards of official IDs, making them ideal for a variety of applications, from novelty designs to professional use.

How to Create a Blank Driver’s License Template

Creating a blank driver’s license template involves using design tools like Photoshop or Canva. Start by designing the layout, adding editable fields, and incorporating security features for authenticity.

4.1 Tools and Software Required

Creating a blank driver’s license template requires graphic design tools like Adobe Photoshop or Canva for layout and design. PDF editors such as Adobe Acrobat or WPS Office are essential for ensuring the template is editable and compatible with PDF formats. Additionally, vector graphics software like Illustrator can be used for detailed designs. Online platforms offering pre-designed templates simplify the process, while tools like Microsoft Word or Google Docs can also be utilized for basic customization.

4.2 Step-by-Step Design Process

Begin by planning the layout, ensuring it mirrors a real driver’s license. Start with a header containing the issuing authority and a footer with a barcode. Add mandatory fields for personal details like name, date of birth, and address. Incorporate design elements such as state-specific holograms or watermarks for authenticity. Use high-resolution images and fonts that match official documents. Finally, save the template as an editable PDF to allow users to input their information easily. This ensures a professional and functional design.

4.3 Adding Security Features

To enhance authenticity, incorporate security features like holograms, watermarks, and UV text. Add a barcode for data verification and include microprinting to prevent forgery. Use a secure font style and ensure the layout matches official documents. These features make the template look professional and deter misuse, ensuring it meets both aesthetic and security standards for various applications.

Where to Download Blank Driver’s License Templates

Blank driver’s license templates are available on websites like Freepik, Template.net, and official government portals. Free and paid options cater to different needs, ensuring accessibility and quality.

5.1 Free Resources and Websites

Several websites offer free blank driver’s license templates in PDF format. Freepik, Template.net, and state-specific DMV portals provide downloadable templates for personal or creative use. These resources often include customizable fields and designs, catering to various needs such as dramatic play, educational activities, or event identification. Users can easily access and print these templates, ensuring convenience and affordability for non-official purposes. Always verify the source’s reliability to avoid low-quality or misformatted templates.

5.2 Paid Options for Professional Designs

For high-quality, professional-grade blank driver’s license templates, consider paid options from reputable sources like Freepik, Template.net, or specialized design marketplaces. These paid designs often feature advanced customization, HD resolution, and authentic detailing, ideal for official or organizational use. Websites like Creative Market and Graphic River offer premium templates with security features and state-specific designs, ensuring a polished and professional finish. Paid options are perfect for events, organizations, or businesses requiring durable, visually impressive identification cards.

5.3 Reliable Sources for Download

When searching for blank driver’s license templates, opt for reliable sources like Freepik, Template.net, or WPS Office. These platforms offer high-quality, royalty-free designs that are easy to download and customize. Many websites provide state-specific and international templates, ensuring authenticity and versatility. Always verify the source’s credibility to avoid low-quality or misrepresented templates. Paid and free options are available, catering to both personal and professional needs, ensuring you find the perfect template for your project.

Legal Considerations

Using blank driver’s license templates legally is crucial. Avoid creating fraudulent IDs. Ensure compliance with local laws to prevent legal consequences.

6.1 Understanding the Legality of Using Blank Templates

Using blank driver’s license templates legally requires careful consideration. These templates are not for creating fraudulent IDs but for legitimate purposes like design, education, or creative projects. Misusing them to produce fake licenses is illegal and can lead to severe legal consequences. Always ensure compliance with local laws and regulations. Verify the legitimacy of your use case before proceeding. Avoid any modifications that could make the template appear official. Legal action can result from misuse, so use responsibly and ethically.

6.2 Avoiding Misuse of Driver’s License Templates

Misusing blank driver’s license templates to create fraudulent IDs is illegal and unethical. These templates are intended for legitimate purposes, such as design projects, educational activities, or organizational identification. Using them to produce fake licenses can lead to legal consequences, including fines and criminal charges. Always ensure templates are used responsibly and ethically. Prevent misuse by avoiding replication of official documents and adding disclaimers to indicate the template’s non-official nature. Verify the legality of your use case to avoid potential legal issues.

6.3 Compliance with Local Laws and Regulations

Using blank driver’s license templates must comply with local laws and regulations to avoid legal penalties; Ensure the template is not used to create fraudulent documents. Verify legal requirements for design, distribution, and use in your jurisdiction. Misuse, such as creating fake IDs, is illegal and punishable under law. Always use templates responsibly and ethically, adhering to legal standards. Avoid any modifications that could make the template appear official. Consult legal experts if unsure about compliance to prevent potential legal consequences.

Printing Tips for Blank Driver’s License Templates

Use high-quality paper and correct printer settings for crisp results. Choose cardstock for durability and a professional look. Laminate for long-lasting use. Test prints on plain paper first to ensure accuracy and avoid waste.

7.1 Choosing the Right Paper Quality

Choosing the right paper quality is essential for creating professional-looking driver’s license templates. Opt for thick, high-grade paper (around 80-100 gsm) to ensure durability and a polished finish. For added durability, consider using cardstock, which provides a sturdy and long-lasting material. Selecting the right finish, such as matte or glossy, will enhance the visual appeal of the template. Always ensure the paper is compatible with your printer for optimal results. Testing prints on plain paper first can help avoid waste and ensure accuracy.

7.2 Printer Settings for Best Results

To achieve the best results when printing blank driver’s license templates, ensure your printer settings are optimized. Select the correct paper type in your printer’s settings to match the quality of your chosen paper. Use high-resolution settings (300 DPI or higher) for crisp text and images. Choose “Fit to Page” for proper scaling and adjust the color mode to grayscale for official looks or color for creative designs. Enable borderless printing if available for a professional finish. Always test settings on plain paper before printing the final template to avoid waste.

7.3 Laminating for Durability

Laminating your blank driver’s license template adds durability and protects it from wear, moisture, and fading. Use a thermal laminator and compatible pouches (3-5 mil thickness) for the best results. Ensure the printed template is completely dry before laminating. Center the template within the pouch to avoid air bubbles. After laminating, trim the edges neatly for a professional finish. This step ensures your custom ID remains intact for long-term use, enhancing its realism and longevity.

Customization Options

Customize your blank driver’s license template by adding personal details, incorporating logos, and modifying colors and fonts to match individual or organizational needs seamlessly and professionally.

8.1 Adding Personal Details

Adding personal details to a blank driver’s license template allows for customization, enabling users to input names, addresses, license numbers, and birthdates. This feature ensures the template is tailored to individual or organizational needs, making it suitable for both official purposes and creative projects. The ability to edit fields provides flexibility, allowing users to enter accurate information efficiently. This functionality is particularly useful for designing realistic IDs for dramatic play or organizational events, ensuring each document is unique and professional in appearance.

8.2 Incorporating Logos or Icons

Incorporating logos or icons into a blank driver’s license template enhances its authenticity and customization. Users can add organizational logos, state emblems, or creative icons to align with specific themes or designs. High-resolution images are recommended for clarity. This feature is particularly useful for event IDs, novelty licenses, or organizational credentials; Logos can be placed in designated areas like headers, footers, or beside the photo section. This customization option ensures the template meets both aesthetic and functional requirements, making it versatile for various applications.

8.3 Modifying Colors and Fonts

Modifying colors and fonts in a blank driver’s license template allows users to tailor the design to specific needs or preferences. Changing the background color, text hue, and font style can enhance visual appeal and professionalism. This customization is ideal for creating official-looking IDs or novelty items. Ensure high-contrast colors for readability, especially for details like names and numbers. Fonts should be clear and legible, mirroring real IDs. This feature enables users to match the template’s aesthetic with its intended use, whether for official purposes or creative projects.

Popular Blank Driver’s License Templates

Popular templates include USA state-specific, international, and novelty designs, offering customization for creative projects, dramatic play, or organizational use, ensuring versatility and aesthetic appeal.

9.1 USA State-Specific Templates

USA state-specific templates are tailored to match the unique designs of driver’s licenses from various states, such as Mississippi, Oklahoma, and Georgia. These templates often include accurate layouts, fonts, and security features, making them ideal for creative projects or educational activities. They are available in PDF format, allowing users to edit and customize details like names, dates, and license numbers. Popular for dramatic play and organizational use, these templates provide a realistic and professional finish, catering to both fun and functional purposes.

9.2 International Templates

International templates offer designs inspired by driver’s licenses from various countries, such as the United Kingdom, post-Brexit, and other nations. These templates often include authentic layouts, fonts, and details specific to each country. They are popular for creative projects, dramatic play, or educational activities. Users can customize names, dates, and other fields, making them versatile for both fun and functional purposes. Their availability in editable PDF formats ensures easy customization to meet individual or organizational needs worldwide.

9.3 Novelty and Fun Designs

Novelty and fun designs add a creative twist to blank driver’s license templates. These designs often feature playful themes, such as superhero, cartoon, or vintage styles. They are perfect for creative projects, themed parties, or personalized gifts. Users can customize details like names, “superpowers,” or humorous restrictions, making them ideal for entertainment purposes. These templates are also popular in school activities or dramatic play, allowing children to engage in imaginative role-playing. Their versatility ensures they can be adapted to various fun and creative scenarios, making them a hit for casual use.

Benefits of Using Editable PDF Templates

Editable PDF templates provide flexibility, allowing easy customization and updates. They save time, reduce errors, and ensure consistency, making them ideal for professional and personal use globally.

10.1 Easy Modification

Editable PDF templates allow users to make quick and straightforward changes, ensuring flexibility. With easy-to-use tools, modifications can be done without professional software, saving time and effort. The ability to customize text, images, and design elements makes it ideal for personalizing driver’s license templates. This feature is particularly useful for creative projects, educational activities, or organizational needs, enabling users to tailor the template to their specific requirements efficiently and effectively.

10.2 Reusability

Reusable PDF blank driver’s license templates provide long-term value by allowing multiple uses. Users can easily save and edit the template for different projects, maintaining consistency. This cost-effective feature saves time and effort, making it ideal for organizations and individuals with recurring needs, such as event IDs or creative designs, ensuring a professional and uniform output every time.

10.3 Professional Finish

Blank driver’s license templates in PDF format deliver a professional finish, ensuring a polished and authentic appearance. With HD quality and a structured layout, these templates mimic real IDs, making them suitable for both personal and professional use. The clean design and precise formatting allow for a seamless customization process, resulting in a final product that looks official and credible, whether for creative projects, event IDs, or organizational purposes.

Common Mistakes to Avoid

11.1 Incorrect Dimensions

Incorrect dimensions in PDF blank driver’s license templates can lead to a unprofessional finish and functionality issues. Always ensure the template matches standard sizes for better authenticity.

Incorrect dimensions in PDF blank driver’s license templates can lead to misalignment, scaling issues, and an unprofessional finish. Using non-standard sizes may result in the template being unusable or appearing fake. Always ensure the template matches the official dimensions of a real driver’s license to maintain authenticity and functionality. Double-check the measurements before printing, as even small errors can render the document invalid or difficult to use. Precision is key to creating a realistic and practical blank driver’s license template.

11.2 Low-Quality Images

Low-quality images in PDF blank driver’s license templates can make the document appear unprofessional and less authentic. Pixelated or blurry visuals may render the template unusable for official purposes. Ensure all graphics, logos, and text are in high resolution to maintain clarity and a professional finish. Avoid using compressed images, as they can degrade the overall quality. Always opt for HD images and clear fonts to ensure the template looks realistic and polished. Poor image quality can undermine the template’s credibility and functionality, making it essential to prioritize visual clarity during creation.

11.3 Incomplete Information

Incomplete information on a PDF blank driver’s license template can render it unusable or unprofessional; Missing fields or sections may lead to confusion or misrepresentation of data. Always ensure all necessary details, such as name, date of birth, and license number, are included and clearly labeled. Illegible or omitted information can cause legal issues or delays in official processes. Double-check the template for completeness before use to avoid complications and ensure accuracy in the final document.

User Reviews and Feedback

Users highly appreciate the ease of customization and versatility of PDF blank driver’s license templates, making them ideal for creative, educational, and professional applications, ensuring satisfaction.

12.1 Positive Experiences

Many users have shared positive experiences with PDF blank driver’s license templates, praising their adaptability and ease of use; Educators often use them for classroom activities, while designers appreciate their customization options. Parents find them ideal for children’s dramatic play, fostering creativity. Professionals value their versatility for event IDs or organizational purposes. The templates’ clarity and HD quality ensure a polished finish, making them a popular choice for both fun and functional applications. Users consistently highlight their convenience and effectiveness across various scenarios.

12.2 Areas for Improvement

While users praise the versatility of PDF blank driver’s license templates, some note areas for improvement. A few mention limited customization options for certain design elements and occasional outdated layouts. Others highlight the need for more state-specific templates to ensure authenticity. Additionally, some users suggest improving the clarity of instructions for first-time editors. Addressing these issues could further enhance the usability and satisfaction of these templates for a broader range of applications and users.

12.3 Real-World Applications

Blank driver’s license templates are widely used in creative projects, educational activities, and roleplay scenarios. They are popular for dramatic play in classrooms, allowing children to engage in realistic role-playing experiences. Additionally, these templates are employed for custom identification at events, such as conferences or themed parties. Their versatility also extends to professional settings, where they can be used for training purposes or as part of organizational ID systems. Overall, they offer a practical and creative solution for various real-world needs.

PDF blank driver’s license templates offer unparalleled versatility and convenience, enabling users to craft personalized IDs for creative, educational, and professional purposes with ease and precision always.

13.1 Final Thoughts on Blank Driver’s License Templates

Blank driver’s license templates in PDF format provide an excellent solution for creating personalized identification documents. They are versatile, easy to use, and suitable for various applications, from creative projects to professional settings. These templates allow users to customize details, ensuring a professional finish while maintaining legal compliance. Their adaptability makes them a valuable tool for educators, designers, and organizations seeking unique identification solutions. Overall, they offer a practical and efficient way to meet diverse ID needs creatively and effectively.

13.2 Future Trends in Driver’s License Design

Future trends in driver’s license design are expected to focus on enhanced security features, such as embedded biometrics and holograms, to combat counterfeiting. Digital integration will likely dominate, with licenses being accessible via mobile apps and digital wallets. Additionally, there may be a shift toward customizable templates that allow users to personalize their IDs while maintaining official standards. Sustainability could also play a role, with eco-friendly materials being used for physical cards. These advancements aim to balance convenience, security, and innovation in ID design.

1 2 3 4 5 6 21